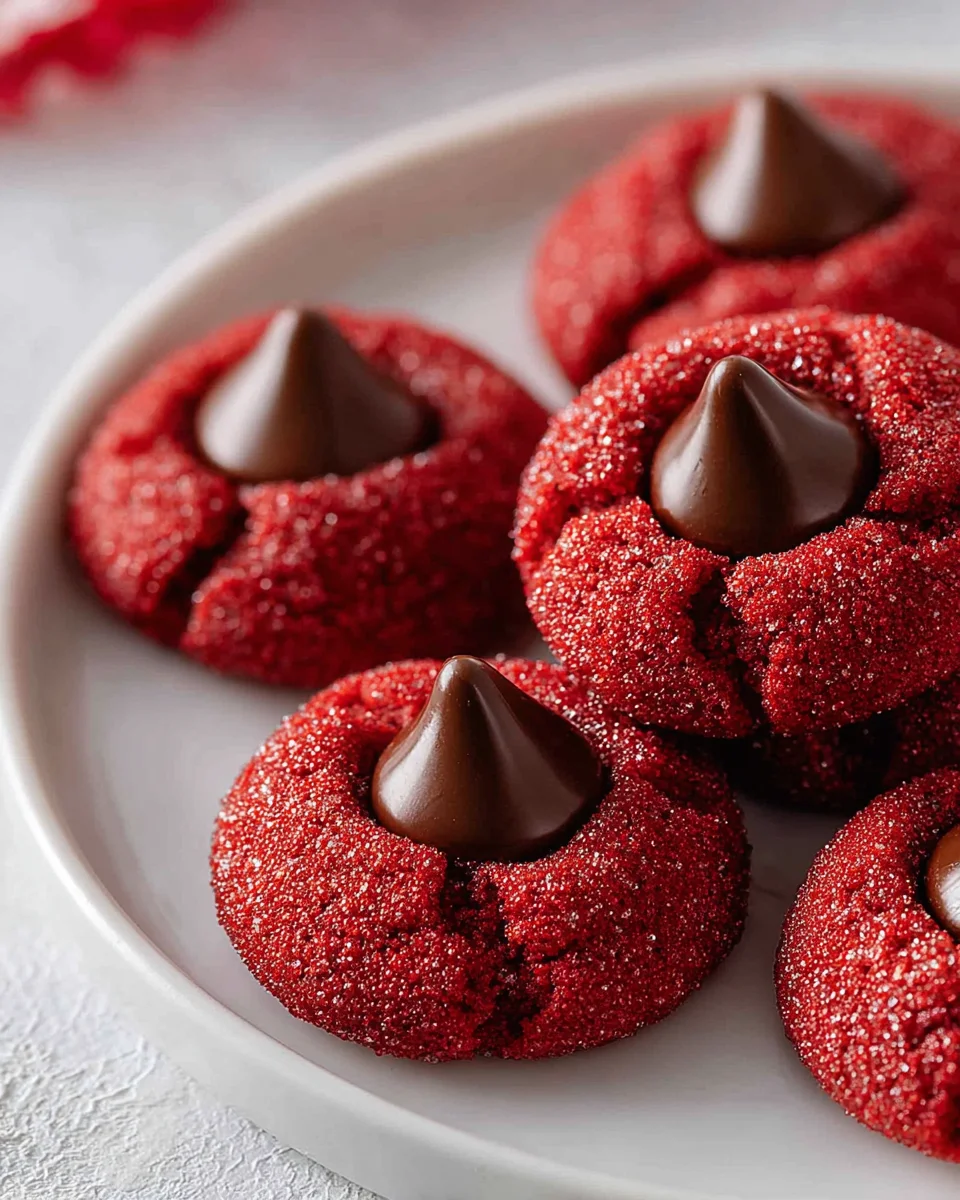
Red Velvet Blossoms Cookies are more than just a treat; they’re a miniature masterpiece, instantly recognizable by their vibrant crimson hue and a delightful “blossom” of creamy white confection at their heart. Have you ever wondered what makes a cookie truly irresistible, captivating both the eye and the palate? We believe it’s the perfect blend of tradition and innovation, culminating in a dessert that evokes warmth, festivity, and pure indulgence. While red velvet’s origins are steeped in early American baking history, evolving from sophisticated cakes served in grand hotels to a beloved comfort food, these blossom cookies take that rich heritage and transform it into a wonderfully convenient and shareable form.
Why Everyone Loves Red Velvet Blossoms Cookies
People adore this dish not only for its striking visual appeal, making it a star on any dessert platter, but also for its incredibly soft, moist texture that melts in your mouth, perfectly complemented by the tangy sweetness of the cream cheese “blossom.” Each bite of these delectable treats delivers a symphony of flavors, a comforting classic reimagined for modern enjoyment. Get ready to bake a batch that will surely become a new favorite!
Ingredients:
Creating these delightful Red Velvet Blossoms Cookies is a joyous experience, and having all your ingredients measured and ready before you start will make the process incredibly smooth. Here’s what you’ll need to bring these festive treats to life:
- For the Red Velvet Cookie Dough:
- 2 ½ cups (300g) all-purpose flour, spooned and leveled. I always recommend spooning flour into your measuring cup rather than scooping directly from the bag to avoid compacting it, which can lead to dry cookies.
- ¼ cup (25g) unsweetened cocoa powder. Choose a good quality unsweetened cocoa powder for the best depth of flavor. This is crucial for the signature red velvet taste.
- 1 teaspoon baking soda. This leavening agent will help your Red Velvet Blossoms Cookies rise beautifully and contribute to their tender texture.
- ½ teaspoon salt. Just a touch of salt enhances all the other flavors and balances the sweetness.
- 1 cup (226g) unsalted butter, softened to room temperature. Ensure your butter is truly soft, but not melted, for proper creaming. This is a cornerstone for great Red Velvet Blossoms Cookies.
- 1 ½ cups (300g) granulated sugar.
- ¼ cup (50g) light brown sugar, packed. The addition of brown sugar adds a subtle molasses note and contributes to the chewiness of the cookies.
- 2 large eggs, at room temperature. Room temperature eggs emulsify better with the butter and sugar, resulting in a smoother, more uniform dough.
- 1 tablespoon pure vanilla extract. Don’t skimp on the vanilla! It’s a key flavor component in classic red velvet.
- 1 tablespoon (15ml) red gel food coloring. Gel food coloring is far more potent than liquid food coloring and will give your Red Velvet Blossoms Cookies that vibrant, unmistakable red hue without thinning out the dough. You might adjust the amount slightly based on your desired intensity.
- ½ cup (120ml) buttermilk. Buttermilk reacts with the baking soda to create that signature tang and tender crumb. If you don’t have buttermilk, you can make your own by adding 1 ½ teaspoons of white vinegar or lemon juice to a measuring cup, then filling the rest with regular milk (dairy or non-dairy) to the ½ cup line. Let it sit for 5-10 minutes until it slightly curdles.
- For Rolling:
- 1 cup (120g) powdered sugar. This creates the beautiful crinkled, snowy coating on your Red Velvet Blossoms Cookies.
- For the Blossoms:
- 24-30 unwrapped Hershey’s Kisses (milk chocolate is classic, but feel free to experiment with other varieties like dark chocolate or even caramel-filled ones!). Make sure these are unwrapped and ready to go before your cookies come out of the oven.
Preparing the Cookie Dough for Red Velvet Blossoms Cookies
Let’s get started on creating the foundation for our delectable Red Velvet Blossoms Cookies! This initial phase is all about careful mixing and ensuring the right consistency for a perfect cookie.
- Sift Dry Ingredients: In a medium bowl, whisk together the 2 ½ cups of all-purpose flour, ¼ cup of unsweetened cocoa powder, 1 teaspoon of baking soda, and ½ teaspoon of salt. Sifting is a really important step here, especially with cocoa powder, which tends to clump. It ensures that your leavening agents and flavorings are evenly distributed throughout the dough, preventing any pockets of unmixed ingredients and guaranteeing a consistent texture in your finished Red Velvet Blossoms Cookies. Set this bowl aside for a moment.
- Cream Butter and Sugars: In a large bowl, using an electric mixer on medium speed, cream together the 1 cup (226g) of softened unsalted butter, 1 ½ cups (300g) of granulated sugar, and ¼ cup (50g) of packed light brown sugar. You’ll want to beat this mixture for about 3-5 minutes, or until it’s wonderfully light, fluffy, and pale in color. During this process, be sure to stop and scrape down the sides of the bowl with a rubber spatula periodically. This ensures that all the ingredients are fully incorporated and prevents any streaks of unmixed butter or sugar, which is key for a uniform cookie base. This creaming action incorporates air, which contributes to the ultimate tenderness of your Red Velvet Blossoms Cookies.
- Add Eggs and Vanilla: Reduce the mixer speed to low. Add the 2 large eggs, one at a time, mixing well after each addition until just combined. Overmixing at this stage can start to develop the gluten in the flour too early, so gentle incorporation is key. After the eggs are mixed in, stir in the 1 tablespoon of pure vanilla extract. Vanilla is a cornerstone flavor for any red velvet recipe, adding depth and warmth.
- Incorporate Red Food Coloring: Now for the star of the show – the vibrant color! Add 1 tablespoon of red gel food coloring to the wet mixture. Mix on low speed until the color is thoroughly distributed and the dough is a uniform, rich red. If you feel the color isn’t quite as intense as you’d like, you can add a tiny bit more, a drop at a time, until you achieve your desired hue. Remember, gel food coloring is highly concentrated, so a little goes a long way for truly stunning Red Velvet Blossoms Cookies.
- Alternate Wet and Dry Ingredients: With the mixer on low speed, gradually add the dry ingredient mixture to the wet ingredients, alternating with the ½ cup of buttermilk. Begin by adding about one-third of the dry ingredients, mix until just combined, then add half of the buttermilk, mix, then another third of the dry ingredients, the remaining buttermilk, and finally the last third of the dry ingredients. Make sure to mix only until just combined after each addition. The goal is to avoid overmixing, which can lead to tough cookies. The dough will be thick and vibrant.
- Chill the Dough (Crucial Step!): Cover the bowl tightly with plastic wrap and refrigerate the dough for at least 1 hour, or preferably 2-3 hours. Do not skip this step! Chilling the dough is absolutely essential for these Red Velvet Blossoms Cookies for several reasons: it allows the flavors to meld and deepen, makes the dough much easier to handle, and most importantly, it prevents the cookies from spreading too much in the oven, ensuring they maintain their beautiful shape and crinkled exterior. If you’re short on time, you can even chill it overnight!
Rolling and Baking Your Red Velvet Blossoms Cookies
Once your dough is perfectly chilled, it’s time to transform it into the individual cookies and get them ready for their oven debut. This is where the magic really starts to happen for our Red Velvet Blossoms Cookies.
- Preheat Oven and Prep Pans: About 15-20 minutes before you plan to bake, preheat your oven to 350°F (175°C). Line two large baking sheets with parchment paper or silicone baking mats. This prevents sticking and makes for easy cleanup. It’s a small step that makes a big difference when baking any type of cookie, especially for maintaining the bottom appearance of your Red Velvet Blossoms Cookies.
- Prepare Powdered Sugar Station: Pour the 1 cup of powdered sugar into a shallow bowl or plate. This will be used to coat our cookie dough balls, giving them that classic snowy, crinkled look.
- Scoop and Roll Dough: Remove the chilled dough from the refrigerator. Using a 1.5-tablespoon cookie scoop (or just about 1-inch diameter balls if eyeballing), scoop out portions of dough. Roll each portion gently between your palms to form a smooth ball. Uniform size is important here for even baking.
- Coat in Powdered Sugar: Drop each dough ball into the bowl of powdered sugar. Roll it around until it is thoroughly coated, almost like a snowball. Don’t be shy with the sugar; a generous coating helps create those lovely crinkles as the cookies bake. This powdered sugar layer is the secret to the beautiful contrasting appearance of Red Velvet Blossoms Cookies.
- Arrange on Baking Sheets: Place the coated dough balls about 2 inches apart on your prepared baking sheets. Give them enough room to spread slightly without touching.
- Bake the Cookies: Bake one sheet at a time in the preheated oven for 10-12 minutes. The exact baking time can vary slightly depending on your oven. You’ll know they’re ready when the edges are just set, and the centers still look slightly soft. They may appear puffy in the oven but will flatten a bit as they cool. Do not overbake, as this will lead to dry cookies. We want tender, chewy Red Velvet Blossoms Cookies!
- Add the Chocolate Kiss “Blossom”: This is the crucial step for creating the “blossom” effect! As soon as you remove the baking sheet from the oven, immediately press one unwrapped Hershey’s Kiss firmly into the center of each warm cookie. The warmth of the cookie will slightly melt the chocolate, allowing it to adhere perfectly and create that signature “blossom” shape. If you wait too long, the cookies will cool and the chocolate won’t stick or melt properly.
Cooling and Storing Your Red Velvet Blossoms Cookies
You’re almost there! Proper cooling is essential to set the cookies and their chocolate tops, and knowing how to store them ensures your Red Velvet Blossoms Cookies remain fresh and delicious for as long as possible.
- Cool on Baking Sheet: Let the cookies remain on the hot baking sheet for about 5-10 minutes after adding the Kisses. This allows them to finish setting up and cool down slightly before being moved. The residual heat from the baking sheet helps the chocolate to fully soften and then begin to firm up again, securely nesting into the cookie.
- Transfer to Wire Rack: Carefully transfer the cooled Red Velvet Blossoms Cookies (still with the Kisses firmly in place) to a wire rack to cool completely. Allowing them to cool on a wire rack ensures air circulation all around the cookies, which prevents them from becoming soggy bottoms and helps the chocolate to fully set without creating condensation. The Kisses will firm up as the cookies cool, creating that iconic blossom top. Resist the urge to handle them too much while the chocolate is still very soft.
- Enjoy! Once fully cooled, these Red Velvet Blossoms Cookies are ready to be devoured! Their vibrant color, soft chewiness, and the sweet surprise of a chocolate kiss in the center make them absolutely irresistible.
- Storing Your Red Velvet Blossoms Cookies: To keep your Red Velvet Blossoms Cookies fresh, store them in an airtight container at room temperature for up to 3-5 days. If you’re stacking them, you might want to place a piece of parchment paper between layers to prevent the chocolate Kisses from sticking to each other, especially if your kitchen is on the warmer side. For longer storage, you can freeze the cooled cookies (without the Kisses) in an airtight container for up to 3 months. When ready to serve, thaw them at room temperature, then warm them slightly in the oven for a few minutes (optional, but delicious!) and add freshly unwrapped Kisses immediately after warming. You can also freeze the baked cookies with the Kisses, but note that the chocolate might develop a slight “bloom” (a white powdery appearance) after thawing, which is harmless but can affect aesthetics.
Tips for Perfect Red Velvet Blossoms Cookies Every Time:
To ensure your Red Velvet Blossoms Cookies are consistently perfect, here are a few extra pointers I’ve learned along the way:
- Ingredient Temperature Matters: Always use room temperature butter and eggs. This allows them to cream together properly, creating an emulsified, smooth dough that results in tender, uniform cookies. Cold ingredients lead to a lumpy mixture and less successful baking.
- Don’t Skimp on the Chill Time: Seriously, the chilling step is non-negotiable for these Red Velvet Blossoms Cookies. It not only makes the dough easier to handle and less sticky but also allows the flavors to deepen and, crucially, prevents the cookies from spreading too much in the oven. This ensures you get those beautiful, thick, crinkled cookies with the perfect texture.
- Quality of Food Coloring: For that truly vibrant red, a good quality gel food coloring is key. Liquid food coloring can add too much moisture to your dough and won’t achieve the same intensity of color. Brands like Wilton or Americolor are excellent choices.
- The Crinkle Effect: Make sure to roll the dough balls generously in powdered sugar. This thick coating is what creates the lovely crinkled pattern as the cookies expand in the oven. If the coating is too thin, the crinkles won’t be as pronounced, and your Red Velvet Blossoms Cookies won’t have that classic snowy look.
- Timing the Kisses: Pressing the Hershey’s Kisses into the cookies immediately after they come out of the oven is vital. The residual heat from the cookie helps the chocolate base melt just enough to securely adhere to the cookie, ensuring your “blossom” stays in place. If you wait even a few minutes, the cookies will start to cool and the Kisses won’t stick as well.
- Oven Calibration: Ovens can vary widely. If your cookies are spreading more than expected, your oven might be running a bit hot, or your dough may need more chilling. Investing in an oven thermometer can help ensure accuracy and consistent results for all your baking endeavors, including these Red Velvet Blossoms Cookies.
- Uniform Cookie Size: Using a cookie scoop helps ensure all your Red Velvet Blossoms Cookies are the same size. This leads to even baking, meaning no burnt edges while others are still raw, and a prettier presentation.
By following these detailed steps and tips, you’re well on your way to baking a batch of truly spectacular Red Velvet Blossoms Cookies that will impress everyone who tries them. Happy baking!
Troubleshooting Common Issues with Red Velvet Blossoms Cookies:
- Cookies Spreading Too Much: If your Red Velvet Blossoms Cookies are spreading excessively, it’s almost always due to the dough not being chilled enough. Ensure you’ve given it at least 1-2 hours in the refrigerator. Also, make sure your butter wasn’t too soft or even slightly melted when you started creaming. Over-greased baking sheets can also contribute to spreading, so parchment paper or silicone mats are preferred.
- Dull Red Color: If your cookies aren’t as vibrantly red as you’d like, you might need to use more gel food coloring. Different brands have varying intensities. Remember, gel food coloring is best; liquid food coloring will likely not achieve the desired vibrant hue.
- Hard or Dry Cookies: This is a classic sign of overbaking. Cookies continue to cook slightly even after they’re removed from the oven. Aim for cookies that are set around the edges but still look slightly soft in the center. They will firm up as they cool, leading to a perfectly chewy texture for your Red Velvet Blossoms Cookies.
- Powdered Sugar Disappearing: If your powdered sugar coating seems to vanish, it could be that you didn’t apply enough sugar, or the dough was too warm when you rolled it. A generous, thick coating is essential for that lovely crinkled effect.
- Kisses Falling Off: If the chocolate Kisses aren’t sticking or fall off, it means you waited too long after removing the cookies from the oven to press them in. The cookies need to be piping hot for the chocolate to melt slightly and adhere properly. Have your Kisses unwrapped and ready to go before your timer even dings!
With these comprehensive instructions and helpful hints, you are fully equipped to master the art of making delicious Red Velvet Blossoms Cookies. This recipe is a true crowd-pleaser, perfect for holidays, parties, or just a sweet treat any time of year. Enjoy the process and the delightful results!
Ingredients:
Creating these delightful Red Velvet Blossoms Cookies is a joyous experience, and having all your ingredients measured and ready before you start will make the process incredibly smooth. Here’s what you’ll need to bring these festive treats to life:
- For the Red Velvet Cookie Dough:
- 2 ½ cups (300g) all-purpose flour, spooned and leveled. I always recommend spooning flour into your measuring cup rather than scooping directly from the bag to avoid compacting it, which can lead to dry cookies.
- ¼ cup (25g) unsweetened cocoa powder. Choose a good quality unsweetened cocoa powder for the best depth of flavor. This is crucial for the signature red velvet taste.
- 1 teaspoon baking soda. This leavening agent will help your Red Velvet Blossoms Cookies rise beautifully and contribute to their tender texture.
- ½ teaspoon salt. Just a touch of salt enhances all the other flavors and balances the sweetness.
- 1 cup (226g) unsalted butter, softened to room temperature. Ensure your butter is truly soft, but not melted, for proper creaming. This is a cornerstone for great Red Velvet Blossoms Cookies.
- 1 ½ cups (300g) granulated sugar.
- ¼ cup (50g) light brown sugar, packed. The addition of brown sugar adds a subtle molasses note and contributes to the chewiness of the cookies.
- 2 large eggs, at room temperature. Room temperature eggs emulsify better with the butter and sugar, resulting in a smoother, more uniform dough.
- 1 tablespoon pure vanilla extract. Don’t skimp on the vanilla! It’s a key flavor component in classic red velvet.
- 1 tablespoon (15ml) red gel food coloring. Gel food coloring is far more potent than liquid food coloring and will give your Red Velvet Blossoms Cookies that vibrant, unmistakable red hue without thinning out the dough. You might adjust the amount slightly based on your desired intensity.
- ½ cup (120ml) buttermilk. Buttermilk reacts with the baking soda to create that signature tang and tender crumb. If you don’t have buttermilk, you can make your own by adding 1 ½ teaspoons of white vinegar or lemon juice to a measuring cup, then filling the rest with regular milk (dairy or non-dairy) to the ½ cup line. Let it sit for 5-10 minutes until it slightly curdles.
- For Rolling:
- 1 cup (120g) powdered sugar. This creates the beautiful crinkled, snowy coating on your Red Velvet Blossoms Cookies.
- For the Blossoms:
- 24-30 unwrapped Hershey’s Kisses (milk chocolate is classic, but feel free to experiment with other varieties like dark chocolate or even caramel-filled ones!). Make sure these are unwrapped and ready to go before your cookies come out of the oven.
Preparing the Cookie Dough for Red Velvet Blossoms Cookies
Let’s get started on creating the foundation for our delectable Red Velvet Blossoms Cookies! This initial phase is all about careful mixing and ensuring the right consistency for a perfect cookie.
- Sift Dry Ingredients: In a medium bowl, whisk together the 2 ½ cups of all-purpose flour, ¼ cup of unsweetened cocoa powder, 1 teaspoon of baking soda, and ½ teaspoon of salt. Sifting is a really important step here, especially with cocoa powder, which tends to clump. It ensures that your leavening agents and flavorings are evenly distributed throughout the dough, preventing any pockets of unmixed ingredients and guaranteeing a consistent texture in your finished Red Velvet Blossoms Cookies. Set this bowl aside for a moment.
- Cream Butter and Sugars: In a large bowl, using an electric mixer on medium speed, cream together the 1 cup (226g) of softened unsalted butter, 1 ½ cups (300g) of granulated sugar, and ¼ cup (50g) of packed light brown sugar. You’ll want to beat this mixture for about 3-5 minutes, or until it’s wonderfully light, fluffy, and pale in color. During this process, be sure to stop and scrape down the sides of the bowl with a rubber spatula periodically. This ensures that all the ingredients are fully incorporated and prevents any streaks of unmixed butter or sugar, which is key for a uniform cookie base. This creaming action incorporates air, which contributes to the ultimate tenderness of your Red Velvet Blossoms Cookies.
- Add Eggs and Vanilla: Reduce the mixer speed to low. Add the 2 large eggs, one at a time, mixing well after each addition until just combined. Overmixing at this stage can start to develop the gluten in the flour too early, so gentle incorporation is key. After the eggs are mixed in, stir in the 1 tablespoon of pure vanilla extract. Vanilla is a cornerstone flavor for any red velvet recipe, adding depth and warmth.
- Incorporate Red Food Coloring: Now for the star of the show – the vibrant color! Add 1 tablespoon of red gel food coloring to the wet mixture. Mix on low speed until the color is thoroughly distributed and the dough is a uniform, rich red. If you feel the color isn’t quite as intense as you’d like, you can add a tiny bit more, a drop at a time, until you achieve your desired hue. Remember, gel food coloring is highly concentrated, so a little goes a long way for truly stunning Red Velvet Blossoms Cookies.
- Alternate Wet and Dry Ingredients: With the mixer on low speed, gradually add the dry ingredient mixture to the wet ingredients, alternating with the ½ cup of buttermilk. Begin by adding about one-third of the dry ingredients, mix until just combined, then add half of the buttermilk, mix, then another third of the dry ingredients, the remaining buttermilk, and finally the last third of the dry ingredients. Make sure to mix only until just combined after each addition. The goal is to avoid overmixing, which can lead to tough cookies. The dough will be thick and vibrant.
- Chill the Dough (Crucial Step!): Cover the bowl tightly with plastic wrap and refrigerate the dough for at least 1 hour, or preferably 2-3 hours. Do not skip this step! Chilling the dough is absolutely essential for these Red Velvet Blossoms Cookies for several reasons: it allows the flavors to meld and deepen, makes the dough much easier to handle, and most importantly, it prevents the cookies from spreading too much in the oven, ensuring they maintain their beautiful shape and crinkled exterior. If you’re short on time, you can even chill it overnight!
Rolling and Baking Your Red Velvet Blossoms Cookies
Once your dough is perfectly chilled, it’s time to transform it into the individual cookies and get them ready for their oven debut. This is where the magic really starts to happen for our Red Velvet Blossoms Cookies.
- Preheat Oven and Prep Pans: About 15-20 minutes before you plan to bake, preheat your oven to 350°F (175°C). Line two large baking sheets with parchment paper or silicone baking mats. This prevents sticking and makes for easy cleanup. It’s a small step that makes a big difference when baking any type of cookie, especially for maintaining the bottom appearance of your Red Velvet Blossoms Cookies.
- Prepare Powdered Sugar Station: Pour the 1 cup of powdered sugar into a shallow bowl or plate. This will be used to coat our cookie dough balls, giving them that classic snowy, crinkled look.
- Scoop and Roll Dough: Remove the chilled dough from the refrigerator. Using a 1.5-tablespoon cookie scoop (or just about 1-inch diameter balls if eyeballing), scoop out portions of dough. Roll each portion gently between your palms to form a smooth ball. Uniform size is important here for even baking.
- Coat in Powdered Sugar: Drop each dough ball into the bowl of powdered sugar. Roll it around until it is thoroughly coated, almost like a snowball. Don’t be shy with the sugar; a generous coating helps create those lovely crinkles as the cookies bake. This powdered sugar layer is the secret to the beautiful contrasting appearance of Red Velvet Blossoms Cookies.
- Arrange on Baking Sheets: Place the coated dough balls about 2 inches apart on your prepared baking sheets. Give them enough room to spread slightly without touching.
- Bake the Cookies: Bake one sheet at a time in the preheated oven for 10-12 minutes. The exact baking time can vary slightly depending on your oven. You’ll know they’re ready when the edges are just set, and the centers still look slightly soft. They may appear puffy in the oven but will flatten a bit as they cool. Do not overbake, as this will lead to dry cookies. We want tender, chewy Red Velvet Blossoms Cookies!
- Add the Chocolate Kiss “Blossom”: This is the crucial step for creating the “blossom” effect! As soon as you remove the baking sheet from the oven, immediately press one unwrapped Hershey’s Kiss firmly into the center of each warm cookie. The warmth of the cookie will slightly melt the chocolate, allowing it to adhere perfectly and create that signature “blossom” shape. If you wait too long, the cookies will cool and the chocolate won’t stick or melt properly.
Cooling and Storing Your Red Velvet Blossoms Cookies
You’re almost there! Proper cooling is essential to set the cookies and their chocolate tops, and knowing how to store them ensures your Red Velvet Blossoms Cookies remain fresh and delicious for as long as possible.
- Cool on Baking Sheet: Let the cookies remain on the hot baking sheet for about 5-10 minutes after adding the Kisses. This allows them to finish setting up and cool down slightly before being moved. The residual heat from the baking sheet helps the chocolate to fully soften and then begin to firm up again, securely nesting into the cookie.
- Transfer to Wire Rack: Carefully transfer the cooled Red Velvet Blossoms Cookies (still with the Kisses firmly in place) to a wire rack to cool completely. Allowing them to cool on a wire rack ensures air circulation all around the cookies, which prevents them from becoming soggy bottoms and helps the chocolate to fully set without creating condensation. The Kisses will firm up as the cookies cool, creating that iconic blossom top. Resist the urge to handle them too much while the chocolate is still very soft.
- Enjoy! Once fully cooled, these Red Velvet Blossoms Cookies are ready to be devoured! Their vibrant color, soft chewiness, and the sweet surprise of a chocolate kiss in the center make them absolutely irresistible.
- Storing Your Red Velvet Blossoms Cookies: To keep your Red Velvet Blossoms Cookies fresh, store them in an airtight container at room temperature for up to 3-5 days. If you’re stacking them, you might want to place a piece of parchment paper between layers to prevent the chocolate Kisses from sticking to each other, especially if your kitchen is on the warmer side. For longer storage, you can freeze the cooled cookies (without the Kisses) in an airtight container for up to 3 months. When ready to serve, thaw them at room temperature, then warm them slightly in the oven for a few minutes (optional, but delicious!) and add freshly unwrapped Kisses immediately after warming. You can also freeze the baked cookies with the Kisses, but note that the chocolate might develop a slight “bloom” (a white powdery appearance) after thawing, which is harmless but can affect aesthetics.
Tips for Perfect Red Velvet Blossoms Cookies Every Time:
To ensure your Red Velvet Blossoms Cookies are consistently perfect, here are a few extra pointers I’ve learned along the way:
- Ingredient Temperature Matters: Always use room temperature butter and eggs. This allows them to cream together properly, creating an emulsified, smooth dough that results in tender, uniform cookies. Cold ingredients lead to a lumpy mixture and less successful baking.
- Don’t Skimp on the Chill Time: Seriously, the chilling step is non-negotiable for these Red Velvet Blossoms Cookies. It not only makes the dough easier to handle and less sticky but also allows the flavors to deepen and, crucially, prevents the cookies from spreading too much in the oven. This ensures you get those beautiful, thick, crinkled cookies with the perfect texture.
- Quality of Food Coloring: For that truly vibrant red, a good quality gel food coloring is key. Liquid food coloring can add too much moisture to your dough and won’t achieve the same intensity of color. Brands like Wilton or Americolor are excellent choices.
- The Crinkle Effect: Make sure to roll the dough balls generously in powdered sugar. This thick coating is what creates the lovely crinkled pattern as the cookies expand in the oven. If the coating is too thin, the crinkles won’t be as pronounced, and your Red Velvet Blossoms Cookies won’t have that classic snowy look.
- Timing the Kisses: Pressing the Hershey’s Kisses into the cookies immediately after they come out of the oven is vital. The residual heat from the cookie helps the chocolate base melt just enough to securely adhere to the cookie, ensuring your “blossom” stays in place. If you wait even a few minutes, the cookies will start to cool and the Kisses won’t stick as well.
- Oven Calibration: Ovens can vary widely. If your cookies are spreading more than expected, your oven might be running a bit hot, or your dough may need more chilling. Investing in an oven thermometer can help ensure accuracy and consistent results for all your baking endeavors, including these Red Velvet Blossoms Cookies.
- Uniform Cookie Size: Using a cookie scoop helps ensure all your Red Velvet Blossoms Cookies are the same size. This leads to even baking, meaning no burnt edges while others are still raw, and a prettier presentation.
Troubleshooting Common Issues with Red Velvet Blossoms Cookies:
- Cookies Spreading Too Much: If your Red Velvet Blossoms Cookies are spreading excessively, it’s almost always due to the dough not being chilled enough. Ensure you’ve given it at least 1-2 hours in the refrigerator. Also, make sure your butter wasn’t too soft or even slightly melted when you started creaming. Over-greased baking sheets can also contribute to spreading, so parchment paper or silicone mats are preferred.
- Dull Red Color: If your cookies aren’t as vibrantly red as you’d like, you might need to use more gel food coloring. Different brands have varying intensities. Remember, gel food coloring is best; liquid food coloring will likely not achieve the desired vibrant hue.
- Hard or Dry Cookies: This is a classic sign of overbaking. Cookies continue to cook slightly even after they’re removed from the oven. Aim for cookies that are set around the edges but still look slightly soft in the center. They will firm up as they cool, leading to a perfectly chewy texture for your Red Velvet Blossoms Cookies.
- Powdered Sugar Disappearing: If your powdered sugar coating seems to vanish, it could be that you didn’t apply enough sugar, or the dough was too warm when you rolled it. A generous, thick coating is essential for that lovely crinkled effect.
- Kisses Falling Off: If the chocolate Kisses aren’t sticking or fall off, it means you waited too long after removing the cookies from the oven to press them in. The cookies need to be piping hot for the chocolate to melt slightly and adhere properly. Have your Kisses unwrapped and ready to go before your timer even dings!
With these comprehensive instructions and helpful hints, you are fully equipped to master the art of making delicious Red Velvet Blossoms Cookies. This recipe is a true crowd-pleaser, perfect for holidays, parties, or just a sweet treat any time of year. Enjoy the process and the delightful results!

Welcome to the sweet finale of our culinary journey! After walking you through the steps, I truly hope you’re as excited about this recipe as I am. This isn’t just another cookie; it’s an experience, a delightful treat that consistently earns rave reviews and happy smiles.
Why I believe these Red Velvet Blossoms Cookies are an absolute must-try? For starters, their visual appeal is simply unmatched. The vibrant red hue, perfectly crinkled edges, and that creamy, white “blossom” of frosting in the center create a stunning contrast that makes them stand out on any dessert platter. They are effortlessly elegant, yet incredibly approachable to make. But beauty isn’t just skin deep here; the flavor profile is what truly seals the deal. You get that classic, subtle cocoa tang of red velvet perfectly balanced with a rich, buttery softness in the cookie itself. Then, that dollop of tangy, sweet cream cheese frosting melts in your mouth, providing the perfect counterpoint and completing the iconic red velvet experience. The texture is divine – wonderfully chewy, yet tender, making each bite an absolute pleasure. They’re impressive enough for a holiday gathering or a special occasion, but surprisingly simple to whip up for an everyday indulgence. I promise, they’re the kind of cookie that disappears quickly, prompting requests for the recipe from everyone who tries them.
Now, let’s talk about how to make these beauties even more uniquely yours! While perfect as is, there’s always room for a little creative flair. For serving, I love arranging them on a simple white cake stand, perhaps with a dusting of cocoa powder or some fresh raspberries scattered around for an extra pop of color. They pair beautifully with a strong cup of coffee or a tall glass of cold milk for a comforting snack. For a more sophisticated dessert, consider serving one alongside a scoop of vanilla bean ice cream or a dollop of whipped cream. They also make fantastic edible gifts, packaged in a pretty box with a ribbon.
As for variations, the possibilities are endless! You could try swapping out the classic cream cheese frosting for a chocolate ganache filling for an intensely decadent treat. Or, for a seasonal twist, imagine a pumpkin spice cream cheese frosting for an autumnal delight. If you’re feeling adventurous, a subtle hint of orange zest in the cookie dough itself could add a wonderful bright note. Don’t be afraid to experiment with different sprinkles on top of the frosting before baking; white nonpareils give a classic look, but gold or silver sprinkles could elevate them for a festive occasion. You could even try making them mini by using a smaller cookie scoop, perfect for bite-sized party treats. Another idea is to incorporate chopped white chocolate chips into the dough for an extra layer of sweetness and texture, enhancing that creamy element even further. And if you’re a nut lover, a finely ground pecan or walnut pressed into the cream cheese before baking would add a lovely crunch and earthy flavor. Think of these suggestions as starting points; the true joy is in making them your own.
So, my dear baker, I implore you: don’t just read about these delightful treats, make them! Grab your apron, preheat your oven, and prepare to fill your home with the most incredible aroma. There’s a profound satisfaction that comes from creating something so beautiful and delicious from scratch, and I truly believe you’ll feel it with every batch of you bake. Once you’ve experienced the magic, I would absolutely love to hear from you. Please, share your baking triumphs, your creative variations, and those glowing reviews from your friends and family. Snap a photo of your masterpieces and share them with the world – let’s inspire each other with our baking adventures! Until next time, happy baking!
Red Velvet Blossoms Cookies: Festive & Easy Holiday Treat!
Red Velvet Blossoms Cookies are a festive holiday treat, featuring a vibrant crimson cookie base with a tender, moist texture, coated in sparkling red sanding sugar, and topped with a creamy chocolate kiss ‘blossom’. They are a delightful combination of classic red velvet flavor and a fun, shareable format, perfect for any celebration.
Ingredients
Instructions
Important Information
Nutrition Facts (Per Serving)
It is important to consider this information as approximate and not to use it as definitive health advice.
Allergy Information
Please check ingredients for potential allergens and consult a health professional if in doubt.


Leave a Comment