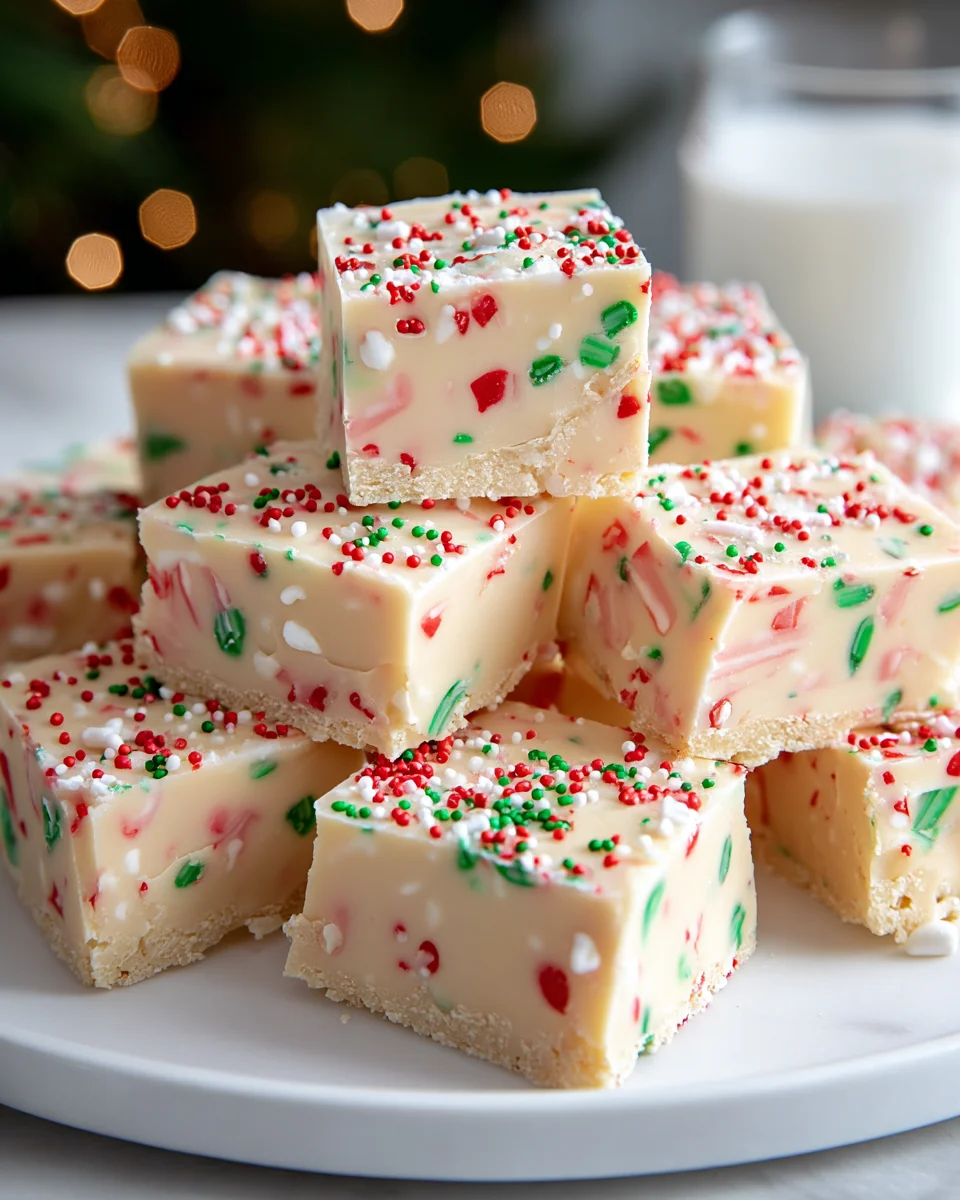
Easy Sugar Cookie Christmas Fudge is the ultimate holiday treat that perfectly captures the magic and nostalgia of the season in every delightful bite. There’s something uniquely comforting about a classic sugar cookie during Christmas, isn’t there? That buttery, sweet flavor, often adorned with festive sprinkles, instantly transports us back to cherished childhood memories of holiday baking with loved ones. Now, imagine infusing that beloved flavor profile into a rich, creamy, and wonderfully simple fudge, and you have a new festive tradition waiting to happen!
This isn’t just any fudge; it’s a delightful concoction that marries the melt-in-your-mouth texture of traditional fudge with the iconic taste and charming crunch of sugar cookie pieces. What makes this particular recipe truly stand out, especially during the bustling holiday period, is its remarkable ease. Forget complicated candy thermometers or endless stirring; this recipe delivers gourmet results with minimal effort. It’s the ideal way to bring festive cheer to your dessert table, create thoughtful edible gifts for friends and family, or simply indulge in a moment of pure bliss by the fireplace. I promise, once you try this incredible Easy Sugar Cookie Christmas Fudge, its irresistible taste and sheer simplicity will make it a cherished part of your annual holiday traditions.
Ingredients:
- For the Fudge Base:
- 1 (14-ounce) can full-fat sweetened condensed milk (I always reach for a quality brand like Eagle Brand, it makes a difference!)
- 24 ounces good quality white chocolate chips or chopped white chocolate bars (I prefer baking-specific white chocolate for a smoother melt, not candy melts, for the best Easy Sugar Cookie Christmas Fudge texture)
- 1 teaspoon pure vanilla extract (the real stuff, please, it elevates the flavor significantly!)
- 1/4 teaspoon salt (just a tiny pinch to balance the sweetness)
- Optional: 1-2 drops gel food coloring (red or green are perfect for a festive Christmas fudge!)
- For the Sugar Cookie Dough Layer:
- 1/2 cup (1 stick) unsalted butter, softened to room temperature (this is crucial for a smooth dough)
- 1 1/2 cups powdered sugar, sifted (sifting prevents lumps and ensures a silky smooth cookie dough texture)
- 1 1/2 cups all-purpose flour, heat-treated (I’ll explain how to do this safely below!)
- 1/2 teaspoon pure vanilla extract (again, pure for that authentic cookie flavor)
- 1/4 teaspoon almond extract (optional, but I find it really enhances that classic sugar cookie taste)
- 1/8 teaspoon salt
- 1-2 tablespoons milk (any kind will do, for adjusting consistency if needed)
- For Decoration:
- 1/2 cup festive Christmas sprinkles (jimmies, nonpareils, even small cookie shapes – whatever makes your heart happy!)
- Optional: A few small sugar cookies (store-bought or homemade) for extra topping once cooled.
Preparing Your Workspace and Ingredients
- Prepare Your Pan: First things first, let’s get our pan ready. I typically use an 8×8 inch square baking pan for a nice thick fudge, but a 9×9 inch pan will also work, yielding slightly thinner pieces. Line your chosen pan with parchment paper, making sure to leave an overhang on all sides. This isn’t just for easy removal later, but it truly makes lifting the entire slab of fudge out a breeze, minimizing any mess or sticky situations. I usually press the paper gently into the corners to ensure a nice, flat base for our Easy Sugar Cookie Christmas Fudge.
- Heat Treat Your Flour: This step is super important, especially since we’re incorporating raw flour into a no-bake treat. Raw flour can contain bacteria, so we need to “cook” it first.
- Microwave Method: My go-to is the microwave. Spread the 1 1/2 cups of all-purpose flour thinly on a microwave-safe plate. Microwave on high in 30-second intervals, stirring well after each interval, until the flour reaches 160°F (71°C). This usually takes about 1-2 minutes total, depending on your microwave’s power. Use an instant-read thermometer to check the temperature.
- Oven Method: Alternatively, you can preheat your oven to 300°F (150°C). Spread the flour on a baking sheet and bake for 5-7 minutes, stirring halfway through, until it reaches 160°F (71°C). Again, use a thermometer to be safe.
Once heat-treated, allow the flour to cool completely to room temperature before proceeding. This prevents it from melting your butter or cooking your other ingredients prematurely.
- Mise en Place: This fancy French term just means “everything in its place,” and it’s my secret to stress-free baking (or no-baking, in this case!). Measure out all your ingredients for both the fudge base and the sugar cookie dough. Soften your butter for the cookie dough layer well in advance; true room temperature butter (soft enough to indent with a finger but not melted) creams beautifully. Sift your powdered sugar for the cookie dough now – trust me, those lumps are not welcome. Having everything ready to go will make the process flow much more smoothly.
Making the Fudge Base
- Melt the White Chocolate and Condensed Milk: This is where the magic begins for our creamy Easy Sugar Cookie Christmas Fudge. In a medium-sized, heavy-bottomed saucepan, combine the 24 ounces of white chocolate chips (or chopped white chocolate) and the 1 (14-ounce) can of sweetened condensed milk. I prefer to use a gentle heat for this to prevent the white chocolate from seizing or burning.
- Low and Slow is the Way to Go: Place the saucepan over low to medium-low heat. Stir constantly with a heat-proof spatula or wooden spoon. The mixture will slowly begin to melt and come together. Be patient here; it might take 5-10 minutes. Do not walk away from it! White chocolate can be finicky, and you want to ensure it melts smoothly and evenly without scorching. Keep stirring until the mixture is completely smooth, shiny, and all the white chocolate has fully dissolved into the condensed milk. There should be no lumps.
- Add Flavor and Salt: Once the mixture is perfectly smooth and glossy, remove the saucepan from the heat. Stir in the 1 teaspoon of pure vanilla extract and the 1/4 teaspoon of salt. The salt really helps to cut through the sweetness and enhances the overall flavor profile.
- Optional Food Coloring (Make it Festive!): If you’re going for a vibrant Christmas look, this is the time to add your gel food coloring. Start with just 1-2 drops of red or green gel food coloring and stir it in thoroughly until you achieve your desired festive hue. Remember, gel colors are highly concentrated, so a little goes a long way! I love a pale green or a soft pinkish-red for this Christmas fudge.
Crafting the Sugar Cookie Dough Layer
- Cream Butter and Sugar: In a medium mixing bowl, using either a hand mixer or a stand mixer fitted with the paddle attachment, cream together the 1/2 cup (1 stick) of softened unsalted butter and the 1 1/2 cups of sifted powdered sugar. Beat on medium speed until the mixture is light, fluffy, and pale in color. This typically takes about 2-3 minutes. Scrape down the sides of the bowl occasionally to ensure everything is well incorporated. This step is essential for creating that delicate, melt-in-your-mouth cookie dough texture that complements our fudge so perfectly.
- Incorporate Dry Ingredients and Extracts: To the creamed butter and sugar, add the cooled, heat-treated 1 1/2 cups of all-purpose flour, the 1/2 teaspoon of pure vanilla extract, the 1/4 teaspoon of almond extract (if using), and the 1/8 teaspoon of salt.
- Mix to Form Dough: Start mixing on low speed until the flour is just incorporated and a crumbly dough begins to form. Be careful not to overmix! Overmixing can lead to a tough dough, and we want our sugar cookie layer to be tender. If the dough seems too dry or crumbly to come together, add 1 tablespoon of milk at a time, mixing until the dough just comes together. You might not need all of it, or you might need a tiny bit more, depending on the humidity and your flour. The goal is a soft, pliable dough that holds its shape.
- Optional: Color the Cookie Dough: If you’re feeling extra festive, you can divide your cookie dough into two or three portions and add a different gel food coloring to each (e.g., one green, one red, one left plain). Knead the color in by hand until evenly distributed. This creates beautiful swirls and adds another layer of Christmas cheer to your Easy Sugar Cookie Christmas Fudge.
Assembling and Setting Your Easy Sugar Cookie Christmas Fudge
- First Fudge Layer: Take about two-thirds of your prepared fudge mixture (the white chocolate base) and pour it into your parchment-lined pan. Using an offset spatula or the back of a spoon, spread it evenly to create the first layer of our festive fudge.
- Dollop the Cookie Dough: Now for the sugar cookie magic! Take small, irregular spoonfuls or pieces of your prepared sugar cookie dough (if you colored it, alternate the colors!) and dollop them randomly over the first layer of fudge. Don’t worry about perfection; rustic is charming here. You want a good distribution of cookie dough chunks throughout the fudge.
- Second Fudge Layer: Gently pour the remaining one-third of your fudge mixture over the cookie dough dollops. Carefully spread it out to cover the cookie dough completely, working slowly to avoid disturbing the cookie dough too much. I sometimes use the back of a warm spoon to help spread it without dragging the cookie dough too much.
- Sprinkle with Joy: Immediately after spreading the top fudge layer, liberally sprinkle your festive Christmas sprinkles all over the top. Press them down ever so gently with your hand to ensure they adhere well to the warm fudge. This is where your Easy Sugar Cookie Christmas Fudge truly gets its holiday sparkle!
- Chill Time is Crucial: Now comes the hardest part: waiting! Place the pan in the refrigerator for at least 2-4 hours, or preferably until completely firm. Do not rush this step. Proper chilling is essential for the fudge to set correctly, allowing it to be cut cleanly and hold its shape. You want it to be firm enough that when you press it gently with a finger, it doesn’t leave an indentation.
Cutting, Storing, and Enjoying Your Easy Sugar Cookie Christmas Fudge
- Remove from Pan: Once fully chilled and firm, lift the fudge out of the pan using the parchment paper overhang. Carefully peel away the parchment paper from all sides. You’ll be left with a beautiful, thick slab of homemade Easy Sugar Cookie Christmas Fudge.
- Warm Your Knife for Clean Cuts: For perfectly clean and sharp cuts, run a large, sharp knife under hot water, wipe it dry, and then make your first cut. Repeat this process for each subsequent cut. This prevents the fudge from sticking to the knife and creates those professional-looking edges.
- Cut into Desired Shapes: Cut the fudge into 1-inch squares or any desired shape. I usually go for classic squares, but you could do rectangles or even use small, festive cookie cutters (though this can be a bit trickier with the sprinkles and dough chunks).
- Optional Extra Decorations: If you’ve saved any small sugar cookies, you can gently place them on top of some of your fudge pieces for an extra adorable touch, especially if you’re gifting them. A tiny drizzle of melted white chocolate could also be added to some pieces for an elegant flourish.
- Storage Suggestions: Store your Easy Sugar Cookie Christmas Fudge in an airtight container at room temperature for up to 1 week, or in the refrigerator for up to 2 weeks. If refrigerating, let it come to room temperature for about 15-20 minutes before serving for the best texture and flavor. This fudge also freezes beautifully for up to 3 months; simply thaw it in the refrigerator overnight before bringing it to room temperature to serve.
- Enjoy and Share: This fudge is not just a treat; it’s a celebration in every bite! It makes a fantastic homemade gift for friends, family, and neighbors during the holidays. Arrange it on a festive platter and watch it disappear. The combination of the smooth, sweet white chocolate fudge and the tender, comforting sugar cookie dough is simply irresistible, and it truly embodies the spirit of Christmas in a delicious, easy-to-make package.

Conclusion:
And there you have it! We’ve journeyed through the magic of creating something truly special, something that promises to be a standout on any dessert table and a cherished treat for loved ones. This isn’t just another sweet; it’s an experience, a delightful fusion of nostalgic flavors wrapped up in an incredibly accessible package. I genuinely believe that this particular recipe is an absolute must-try for anyone looking to add a touch of whimsy and irresistible sweetness to their culinary repertoire, especially as the holidays approach, or simply when you crave a comforting, homemade indulgence. Its creamy, melt-in-your-mouth texture, combined with that iconic, buttery sugar cookie flavor, is truly a match made in heaven. The subtle hint of vanilla, the tender crumbs of cookie distributed throughout, and the vibrant festive sprinkles on top make every single bite an adventure for your taste buds. It’s that perfect balance of familiar comfort and exciting decadence that makes it so uniquely appealing.
What truly sets this treat apart, beyond its incredible taste, is its sheer simplicity. I know how daunting some baking projects can seem, especially during busy times, but this recipe removes all that stress. It’s designed to be straightforward, using readily available ingredients and steps that are easy to follow, even for those who might consider themselves kitchen novices. You don’t need fancy equipment or advanced pastry skills to achieve perfection here; just a little enthusiasm and a few basic tools will get you to an absolutely stunning result. The joy of creating something so professional-looking and tasting with minimal effort is incredibly rewarding, and trust me, you’ll feel like a culinary wizard when you present this gorgeous confection. It’s the kind of recipe that builds confidence in the kitchen and sparks a love for homemade treats.
Now, let’s talk about how to truly make the most of your incredible creation. While a simple square of this delightful fudge is perfect on its own, there are so many wonderful ways to enjoy and share it. For serving, I love arranging squares on a beautiful platter alongside other holiday goodies like gingerbread cookies or peppermint bark. It makes a stunning visual display and offers a lovely contrast of flavors and textures. Imagine a cozy evening, perhaps by a crackling fire, with a steaming mug of artisanal coffee or a rich, dark hot cocoa, perfectly complemented by a square of this delightful fudge. It’s also absolutely divine when served chilled, offering a firmer, more intense bite. For a more elegant presentation, you could cut it into small decorative shapes using mini cookie cutters before it fully sets.
Feeling adventurous? The beauty of this recipe lies in its versatility. While the base for the Easy Sugar Cookie Christmas Fudge is perfect as is, you can certainly play around with variations. Why not try adding a different extract? A hint of almond extract could elevate the sugar cookie flavor even further, or a touch of peppermint extract could transform it into a minty Christmas dream. You could also experiment with different toppings. Instead of just sprinkles, consider drizzling melted white chocolate or caramel over the set fudge, or sprinkle on some crushed candy canes for an extra festive crunch. For a richer texture, finely chopped toasted pecans or walnuts would be a fantastic addition, especially if you’re a fan of nutty desserts. You could even incorporate a layer of melted milk chocolate on top for a truly decadent three-layer treat. And don’t feel limited to Christmas colors! By simply changing the sprinkles, this fudge can be adapted for any occasion – pastel sprinkles for Easter, orange and black for Halloween, or even team colors for a game day treat. The possibilities are truly endless, allowing you to personalize it to your heart’s content.
My biggest encouragement to you now is this: please give this recipe a try! Seriously, you won’t regret it. It’s one of those recipes that brings so much joy, both in the making and in the sharing. Imagine the smiles on the faces of your friends and family as they bite into this homemade goodness. It makes for fantastic edible gifts, wrapped beautifully in cello bags with a festive ribbon, or as a thoughtful addition to a holiday cookie exchange. There’s nothing quite like the pride of sharing a treat you’ve made yourself, especially when it’s this incredibly delicious and impressive. I am so confident that this recipe will become a new favorite in your household, a go-to for those moments when you need a little something sweet and special.
Once you’ve whipped up your batch of this delightful fudge, I would absolutely love to hear about your experience! Did you stick to the original recipe, or did you get creative with some variations? What was your favorite part of the process? Did you share it with loved ones, or did you keep it all to yourself (no judgment here!)? Please share your stories and photos; it genuinely brightens my day to see your culinary successes and hear how these recipes bring joy into your homes. Your feedback and creativity inspire me and help this wonderful community grow. So, roll up your sleeves, gather your ingredients, and get ready to create some truly unforgettable sweetness. Happy baking, and happy indulging!
Easy Sugar Cookie Christmas Fudge
Easy Sugar Cookie Christmas Fudge is the ultimate holiday treat that perfectly captures the magic and nostalgia of the season in every delightful bite. This rich, creamy, and wonderfully simple fudge combines classic sugar cookie flavor with melt-in-your-mouth fudge, all made with minimal effort. It’s ideal for festive desserts, edible gifts, or a simple holiday indulgence.
Ingredients
Instructions
Important Information
Nutrition Facts (Per Serving)
It is important to consider this information as approximate and not to use it as definitive health advice.
Allergy Information
Please check ingredients for potential allergens and consult a health professional if in doubt.


Leave a Comment