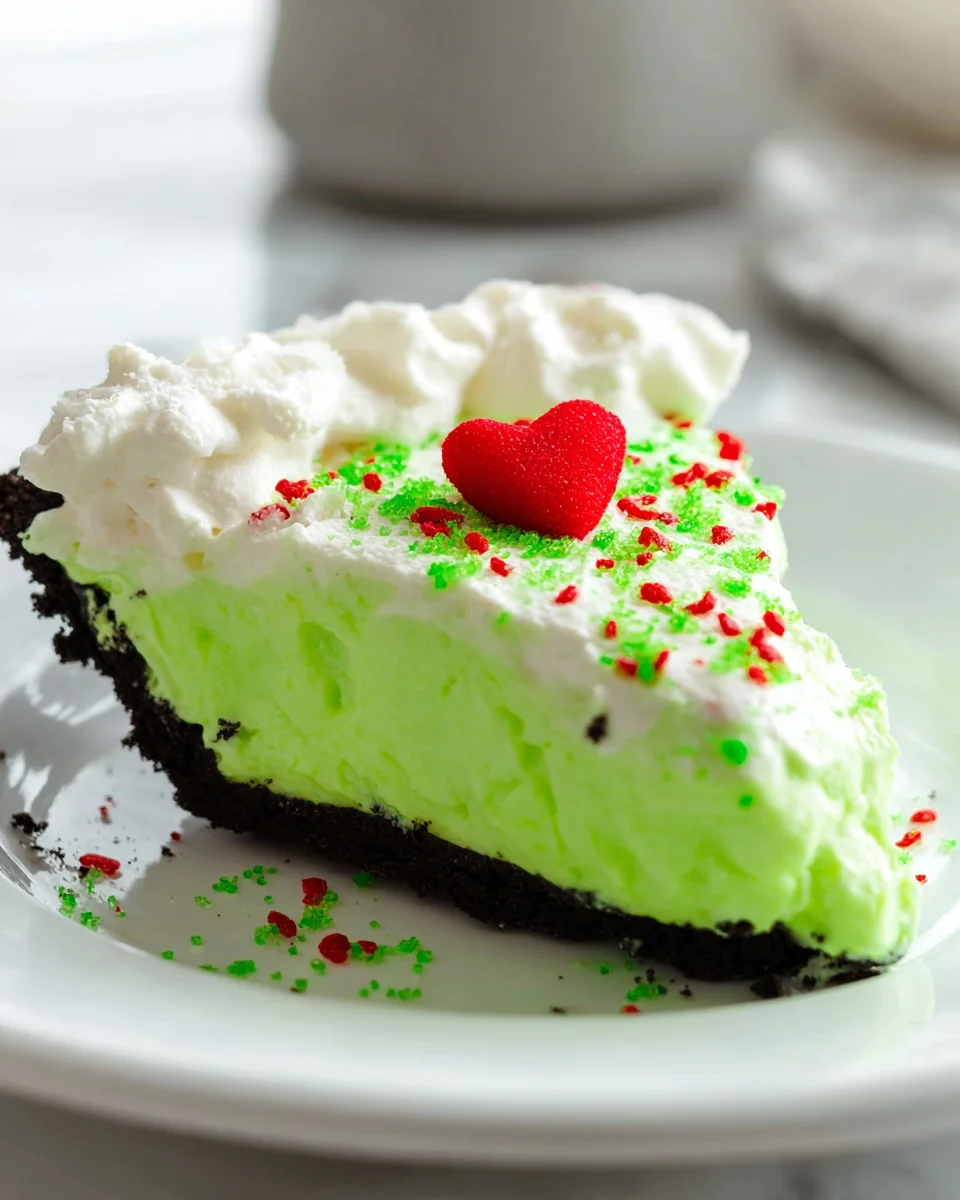
Grinch Pie is more than just a dessert; it’s a vibrant, festive declaration for your holiday table, guaranteed to steal the show – not Christmas! Are you ready to embrace a playful touch of mischief and an explosion of delightful flavor this festive season? I know I am! This iconic, emerald-hued treat draws its whimsical inspiration directly from the beloved Dr. Seuss classic, “How the Grinch Stole Christmas.” It’s a wonderfully fitting tribute, instantly recognizable and a favorite for anyone looking to infuse their celebrations with a bit of extra cheer and a pop of unforgettable color.
People absolutely adore this dish for so many reasons. Its appeal lies not only in its striking, festive appearance but also in its incredible taste and texture. Imagine a wonderfully smooth, creamy, and often refreshingly cool filling, typically bursting with sweet mint or zesty lime flavors, all nestled within a crisp, complementary crust. It’s a truly delightful experience for the palate, offering a perfect balance of sweetness and a satisfying mouthfeel. Moreover, many variations of the Grinch Pie are wonderfully simple, often requiring no baking at all, which makes them an absolute lifesaver during the bustling holiday preparations. It’s truly a magnificent centerpiece that captures the joyous, playful spirit of the holidays in every delicious slice.
Ingredients:
-
For the Graham Cracker Crust:
- 1 ½ cups (approximately 10-12 full sheets) graham cracker crumbs. I find that crushing them yourself often yields a fresher flavor and a better texture than pre-crushed crumbs, but either will work beautifully for our Grinch Pie!
- ¼ cup granulated sugar. This adds just a touch of sweetness to balance the richness of the butter and provide a lovely contrast to the creamy filling.
- 6 tablespoons unsalted butter, melted. Unsalted butter gives us complete control over the saltiness, and melting it properly is key to binding those crumbs into a perfect crust for our delightful Grinch Pie.
-
For the Zesty Green Grinch Pie Filling:
- 2 (8-ounce) packages cream cheese, full-fat and softened to room temperature. This is crucial for a smooth, lump-free filling. Don’t rush this step!
- 1 (14-ounce) can sweetened condensed milk. This magical ingredient provides both sweetness and a wonderful, creamy texture, eliminating the need for additional sugar and ensuring our Grinch Pie filling is perfectly balanced.
- ½ cup fresh lime juice. Freshly squeezed makes all the difference here! It provides that bright, zesty tang that cuts through the richness and gives our Grinch Pie its distinctive flavor.
- 2 teaspoons vanilla extract. A good quality vanilla enhances all the other flavors in the filling.
- ½ teaspoon lime zest (optional, but highly recommended for an extra burst of citrus aroma). If you’re using fresh limes for the juice, definitely don’t let that zest go to waste!
- Green gel food coloring, as needed (I usually start with a few drops and add more until I get that perfect “Grinch green”). Gel coloring gives a more vibrant color without thinning the filling.
- 1 (8-ounce) container frozen whipped topping (like Cool Whip), thawed, or 2 cups freshly made whipped cream. This provides the airy, light texture that makes this Grinch Pie so irresistible. If using homemade, make sure it’s lightly sweetened.
-
For the Whimsical Grinch Pie Topping & Decoration:
- 1 (8-ounce) container frozen whipped topping, thawed, or 2 cups freshly made whipped cream (reserved from above, or an additional batch). This will be our cloud-like topping.
- 1 large red heart-shaped candy (like a gummy heart, or a heart cut from a red fruit roll-up). This is the quintessential touch that gives our Grinch Pie its namesake charm!
- Optional: Green sprinkles, extra lime zest, or maraschino cherries for additional festive flair.
Preparing the Perfect Graham Cracker Crust for Your Grinch Pie
Creating a sturdy yet flaky crust is the first step to a truly spectacular Grinch Pie. It acts as the perfect foundation for our vibrant green filling.
- Gather Your Tools and Preheat: First things first, grab a 9-inch pie plate. You can use glass or ceramic; both work wonderfully. If you plan to bake the crust for extra crispness, go ahead and preheat your oven to 350°F (175°C). While this Grinch Pie crust can be no-bake, I find a quick bake really elevates the texture and flavor, preventing it from getting soggy later.
- Crush Those Crackers: Now, let’s get those graham crackers into crumbs! You have a few options here. My preferred method is using a food processor; it makes quick work of it and yields a very uniform crumb. Simply pulse the graham cracker sheets until they resemble fine sand. If you don’t have a food processor, no worries! Place the crackers in a large Ziploc bag, seal it well (removing as much air as possible), and then use a rolling pin, the bottom of a heavy pan, or even a sturdy bottle to crush them. Aim for fine crumbs, but a few slightly larger pieces add a nice textural element, so don’t stress about absolute perfection.
- Combine and Conquer: In a medium bowl, combine your finely crushed graham cracker crumbs with the ¼ cup of granulated sugar. Give it a good stir with a fork or whisk to ensure the sugar is evenly distributed. Then, pour in your 6 tablespoons of melted unsalted butter. Now, this is where the magic happens! Use a fork or your clean fingertips to mix everything together thoroughly. You want every single crumb to be coated in butter. The mixture should resemble wet sand and hold together when you squeeze a small amount in your hand. If it seems too dry, you can add another tablespoon of melted butter, but usually, 6 tablespoons is just right.
- Press into Perfection: Transfer the buttery crumb mixture into your prepared 9-inch pie plate. Now, it’s time to press! Use the bottom of a flat-bottomed glass or a measuring cup to firmly press the crumbs evenly across the bottom and up the sides of the pie plate. It’s important to press quite firmly to ensure the crust holds its shape beautifully. Pay special attention to the edges and where the bottom meets the sides, as these areas tend to be weaker. A well-pressed crust is key for clean slices of our Grinch Pie later.
- Bake or Chill:
- For a Baked Crust (Recommended): Place the pie plate in your preheated oven and bake for 8-10 minutes, or until the edges are lightly golden and fragrant. Baking helps to set the crust, making it crispier and preventing it from becoming soggy when you add the filling.
- For a No-Bake Crust: If you’re short on time or prefer a softer crust, simply place the pressed crust in the refrigerator for at least 30 minutes to firm up.
Once baked, or if chilling, allow the crust to cool completely on a wire rack before adding the filling. This is a critical step – adding the filling to a warm crust will melt it and create a messy Grinch Pie! Patience is a virtue here.
Crafting the Iconic Green Grinch Pie Filling: The Heart of Your Grinch Pie
This is where our Grinch Pie truly comes to life with its signature vibrant green color and irresistibly creamy, zesty flavor. Get ready to mix up some magic!
- Softening the Cream Cheese (The Foundation of Smoothness): Ensure your two 8-ounce packages of full-fat cream cheese are truly at room temperature. This is not just a suggestion; it’s a commandment for a lump-free filling! If your cream cheese is cold, you’ll end up with stubborn lumps, no matter how much you beat it. You can leave it on the counter for a couple of hours, or for a quicker method, unwrap it and microwave it in 15-second intervals until slightly softened, being careful not to melt it.
- Beat the Cream Cheese to Velvety Smoothness: In a large mixing bowl, using an electric mixer (handheld or stand mixer with a paddle attachment), beat the softened cream cheese on medium speed for 2-3 minutes. You want it to be incredibly smooth and creamy, almost fluffy. Scrape down the sides of the bowl frequently to ensure everything gets incorporated. This step creates the perfect base texture for our luscious Grinch Pie.
- Introduce the Sweetness and Zest: With the mixer on low speed, gradually pour in the entire 14-ounce can of sweetened condensed milk. Continue beating until it’s fully combined and the mixture is even smoother. Scrape the bowl again. Next, add the ½ cup of fresh lime juice, the 2 teaspoons of vanilla extract, and if you’re using it (and I highly recommend it!), the ½ teaspoon of lime zest. Beat on low speed until just combined. Be careful not to overmix once the liquid is added, as we don’t want to incorporate too much air at this stage. Observe the texture: At this point, you’ll notice the mixture thickening beautifully, thanks to the acidity of the lime juice interacting with the condensed milk and cream cheese. This is a crucial reaction for the pie’s set.
- Achieve That Signature Grinch Green: Now for the fun part – giving our Grinch Pie its iconic color! Add your green gel food coloring, a few drops at a time. Mix on low speed after each addition until the color is evenly distributed. Keep adding and mixing until you reach that perfect Grinch green – vibrant and festive, but not unnaturally dark. Remember, a little gel coloring goes a long way, so start small! I usually aim for a cheerful, bright green.
- Gently Fold in the Whipped Topping: This step is key to making your Grinch Pie filling light and airy. If you’re using thawed whipped topping (like Cool Whip), gently fold it into the cream cheese mixture using a rubber spatula. Use a cutting and folding motion, lifting from the bottom of the bowl and folding it over the top, rotating the bowl as you go. If you’re using freshly made whipped cream, ensure it’s softly whipped to medium peaks, then fold it in with the same gentle technique. The goal here is to combine everything without deflating the air you’ve whipped into the topping. This creates that delightful, melt-in-your-mouth texture that makes this Grinch Pie so special.
- Quick Chill (Optional, but Beneficial): If your filling seems a little on the softer side after mixing, you can pop the bowl into the refrigerator for about 15-20 minutes. This slight chill can help it firm up just enough to make it easier to transfer into the crust and ensure a beautifully set Grinch Pie.
Assembling Your Delightful Grinch Pie: Bringing It All Together
With our perfectly cooled crust and vibrant green filling ready, it’s time to assemble the star of the show – your very own Grinch Pie!
- Fill the Crust: Carefully spoon or pour the entire green Grinch Pie filling into your completely cooled graham cracker crust. I always make sure my crust is fully chilled to prevent any melting or soggy bottom situations.
- Smooth and Level: Use an offset spatula or the back of a spoon to gently spread the filling evenly across the crust, all the way to the edges. Make sure the top is as smooth and level as possible. This creates a beautiful canvas for our topping and ensures every slice of Grinch Pie looks picture-perfect.
- The Critical Chill: This is arguably the most important step for a successful Grinch Pie! Cover the pie plate loosely with plastic wrap (try not to let the plastic touch the surface of the filling if possible). Transfer the pie to the refrigerator and chill for at least 4-6 hours. Ideally, I recommend chilling it overnight. This long chill time allows the filling to fully set and firm up, making for clean slices and a truly stable, delicious Grinch Pie. Do not skip or shorten this step, no matter how tempting it is to dig in!
Decorating Your Grinch Pie with Whimsical Toppings
Once your Grinch Pie is perfectly chilled and set, it’s time for the final touch – the decoration! This is where we truly capture the spirit of the Grinch.
- Prepare Your Topping: If you’re using thawed whipped topping (Cool Whip), ensure it’s ready. If you’re making fresh whipped cream for the topping, whip it until it forms medium peaks, and sweeten it to your liking with a little powdered sugar (about 2 tablespoons per cup of heavy cream is a good starting point).
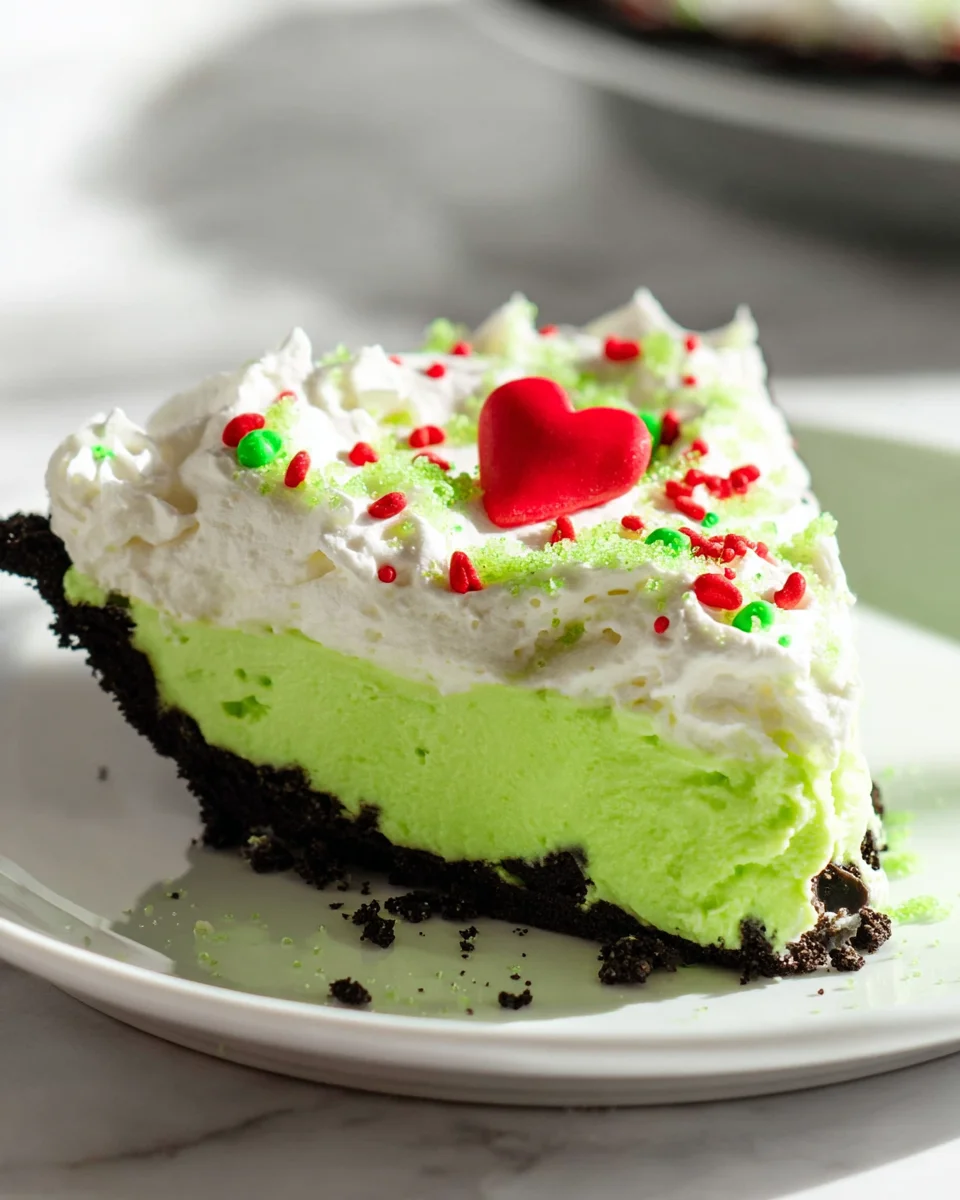
- Apply the Whipped Topping: You can either spread the whipped topping evenly over the entire surface of the chilled Grinch Pie using an offset spatula, creating a smooth, cloud-like layer. Or, for a more decorative look, transfer the whipped cream to a piping bag fitted with a star or round tip and pipe swirls or dollops over the pie. I often like to pipe a decorative border around the edge, leaving the center clear for our special Grinch heart.
- Place the Grinch’s Heart: This is the iconic element! Carefully place your large red heart-shaped candy directly in the center of the pie. This represents the Grinch’s heart, which famously grew three sizes that day. This single detail transforms a delicious lime pie into a delightful Grinch Pie!
- Add Optional Embellishments: For extra flair, you can sprinkle a few green sprinkles around the base of the heart, or lightly grate some extra lime zest over the whipped cream for a burst of fresh aroma. A few maraschino cherries could also add a festive pop of red around the edges, echoing the central heart. Just remember, sometimes less is more when it comes to decoration, allowing that central heart to truly shine.
Serving and Enjoying Your Perfect Grinch Pie
The moment of truth has arrived! After all your careful preparation and patience, it’s time to enjoy the fruits of your labor – or, in this case, the delightful Grinch Pie!
- Slice with Care: Using a sharp knife that has been run under hot water and wiped clean between each cut will help you achieve beautifully clean slices. This is especially important for a creamy pie like this Grinch Pie. Wipe the knife clean after each slice to prevent dragging the filling and keep your servings looking neat.
- Serve Chilled: This Grinch Pie is best served cold, straight from the refrigerator. The chill enhances its refreshing qualities and ensures the filling maintains its perfect texture.
- Storage: Any leftover Grinch Pie should be stored in the refrigerator, loosely covered with plastic wrap, for up to 3-4 days. While it’s delightful on day one, the flavors often meld even further on day two, making for an equally enjoyable treat. However, the crust might soften slightly over time.
- Share the Joy: Gather your loved ones and share this festive and delicious Grinch Pie! It’s not just a dessert; it’s a conversation starter and a guaranteed smile-maker, especially during the holidays. Enjoy every zesty, creamy, wonderfully green bite of your homemade Grinch Pie!
Conclusion:
Well, my friends, we’ve reached the sweet finale of our culinary adventure, and I truly hope you’re as excited as I am about what we’ve created together! This isn’t just another dessert recipe; it’s an invitation to bring a burst of vibrant joy and unforgettable flavor to your table with minimal fuss. I truly believe this particular dessert stands out as a genuine showstopper, delivering on both whimsical appearance and incredible taste. From its striking color to its delightfully creamy texture and tangy-sweet profile, it truly is a magnificent creation that consistently impresses everyone who tries it.
What makes this recipe an absolute must-try, you ask? For starters, it’s ridiculously easy to put together, making it perfect for both seasoned bakers and complete novices. You don’t need a pantry full of obscure ingredients or a culinary degree to achieve perfection. The simplicity of the steps belies the sophisticated flavor that emerges – a perfect harmony of tartness and sweetness that dances on your palate. Beyond its ease, there’s the sheer joy it brings. Imagine the delight on your guests’ faces when you present such a vibrant, eye-catching dessert! It’s a conversation starter, a mood lifter, and honestly, just a really, really good pie. I’ve seen it transform ordinary gatherings into something truly special, simply by its presence.
Serving Suggestions & Creative Variations to Elevate Your Grinch Pie:
While this particular Grinch Pie is absolutely perfect as is, served chilled and perhaps with a simple dollop of whipped cream, I always love to offer a few ideas to spark your creativity and help you make it uniquely yours. For an extra touch of indulgence, consider garnishing each slice with a sprinkle of finely grated white chocolate or a few fresh raspberries to complement the tartness. A tiny sprig of fresh mint can also add a beautiful aromatic finish and a contrasting splash of green, enhancing the visual appeal even further.
If you’re hosting a party, why not turn this into individual dessert cups? Simply layer the crust mixture and filling into small ramekins or elegant glasses for a ready-to-serve treat. This makes portion control a breeze and adds a touch of sophistication to your presentation. You could even experiment with different crusts! While a classic graham cracker crust is always a winner, imagine the delightful crunch of a shortbread crust or a ginger snap crust for a slight spice kick. For a holiday twist, a crushed peppermint cookie crust could be absolutely magical, bringing a festive aroma and flavor to the pie.
Feeling a bit adventurous? You could swirl in a touch of raspberry or strawberry puree into the filling before chilling to create beautiful marbled patterns and introduce another layer of fruitiness. Or, for those who love a bit of texture, a sprinkle of toasted coconut flakes on top before serving would be divine. The possibilities are truly endless, and that’s what makes cooking and baking so much fun – the freedom to personalize and make a recipe your own!
Your Turn to Create and Share!
Now that I’ve shared all my tips and tricks, it’s your turn to roll up your sleeves and bring this delightful dessert to life in your own kitchen. I promise you, the reward of seeing and tasting your very own homemade Grinch Pie will be immense. Don’t be shy about experimenting with those serving suggestions or coming up with your own unique twists. That’s the beauty of cooking – it’s a personal expression! I am genuinely excited for you to experience the joy of making and sharing this recipe.
Once you’ve whipped up your masterpiece, I would absolutely love for you to share your experiences! Tell me how it turned out, what variations you tried, or what your family and friends thought. Did it bring smiles to their faces? Did it become an instant hit? Your feedback and shared creations inspire me and, more importantly, can inspire others in our wonderful cooking community. So, go forth, bake with passion, and prepare to delight everyone with this incredibly delicious and charming dessert!
Grinch Pie
A vibrant, festive, and easy-to-make no-bake Grinch Pie, featuring a creamy green white chocolate pudding filling in an Oreo crust, topped with Cool Whip and whimsical heart sprinkles, perfect for holiday celebrations.
Ingredients
Instructions
Important Information
Nutrition Facts (Per Serving)
It is important to consider this information as approximate and not to use it as definitive health advice.
Allergy Information
Please check ingredients for potential allergens and consult a health professional if in doubt.

Leave a Comment