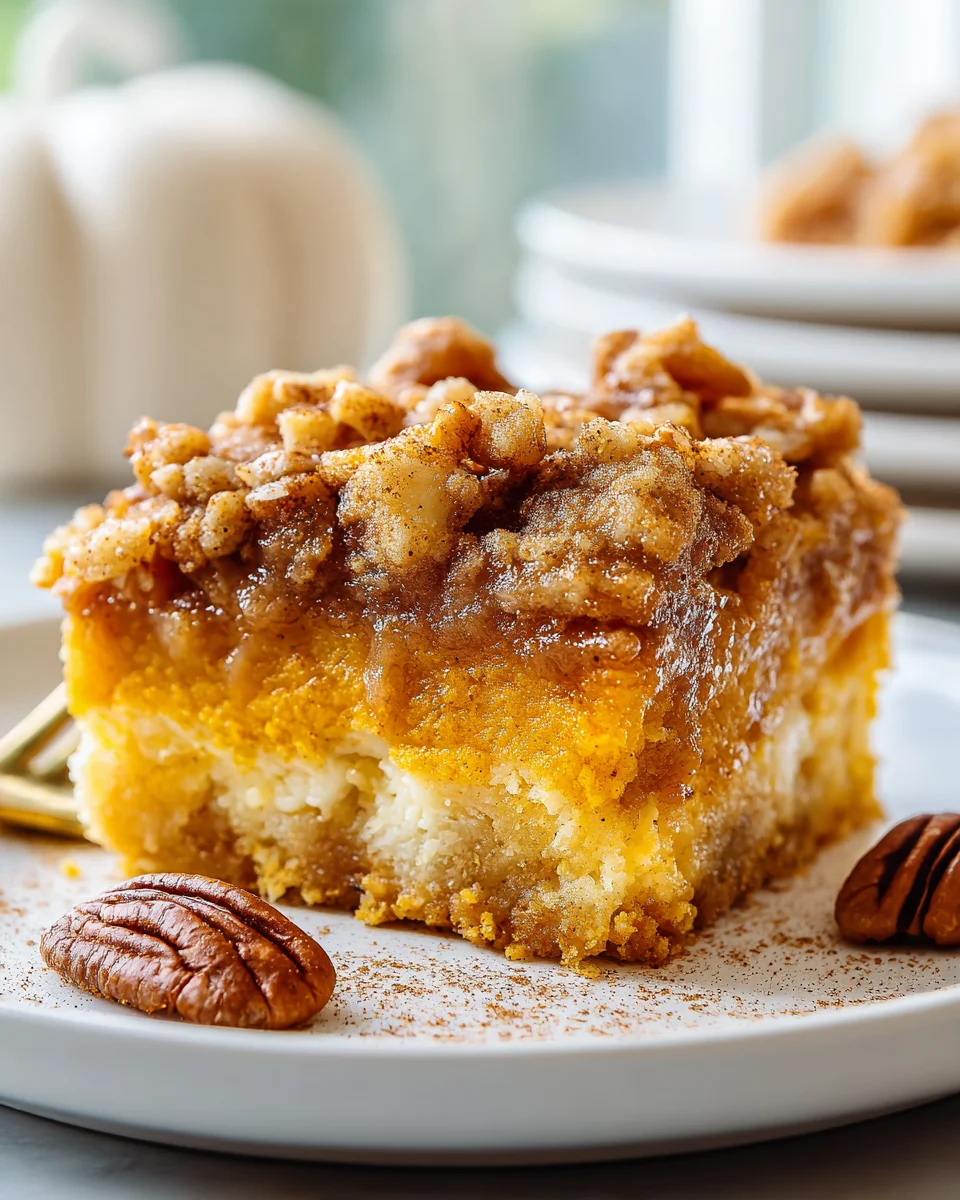
Pumpkin Dump Cake is one of those dessert miracles that seems almost too good to be true. Imagine a dish that delivers all the comforting flavors of autumn—rich, spiced pumpkin custard topped with a golden, buttery cake crust—all with minimal effort and maximum reward. I am absolutely thrilled to share this recipe with you, a true staple for anyone looking to impress without the stress, especially as the cooler weather invites us indoors for cozy gatherings.
The beauty of the “dump cake” lies squarely in its name; it’s a no-fuss creation where ingredients are quite literally “dumped” into a pan, leading to an incredibly satisfying result. While its exact origins are a bit hazy, this style of cake gained popularity in mid-20th century America, celebrated for its ingenious simplicity and potluck-perfect nature. This particular Pumpkin Dump Cake truly shines because it combines that beloved convenience with the quintessential tastes of fall. People adore it for its delightful contrast of textures—a velvety smooth pumpkin base juxtaposed with a slightly crispy, sweet cake topping—and the way it fills the home with an inviting aroma of cinnamon and nutmeg. It’s not just a dessert; it’s a warm hug in a bowl, making it the ideal centerpiece for Thanksgiving dinners or any autumnal celebration.
Ingredients:
- One (1) 15-ounce can pure pumpkin puree (not pumpkin pie filling)
- One (1) 12-ounce can evaporated milk
- One (1) cup granulated sugar
- One (1) half (1/2) cup packed light brown sugar
- Two (2) large eggs
- Two (2) teaspoons ground cinnamon
- One (1) teaspoon ground nutmeg
- One (1) half (1/2) teaspoon ground ginger
- One (1) quarter (1/4) teaspoon ground cloves
- One (1) teaspoon vanilla extract
- One (1) half (1/2) teaspoon salt
- One (1) 15.25-ounce box yellow cake mix (or spice cake mix for an extra flavor kick!)
- One (1) cup (two sticks) unsalted butter, melted or cut into very thin slices
- One (1) cup chopped pecans or walnuts (optional, but highly recommended for texture!)
- Non-stick cooking spray or butter for greasing the baking dish
Prepping for Perfection: Getting Started with Your Pumpkin Dump Cake
-
Preheat Your Oven and Prepare Your Dish:
My first step, and a crucial one for any baking endeavor, is to always preheat my oven. I set mine to a cozy 350°F (175°C). While the oven is warming up, I grab my trusty 9×13-inch baking dish. For me, a glass or ceramic dish works wonderfully, as it helps with even cooking and lets you see that beautiful golden-brown crust forming. I generously spray the bottom and sides of the dish with non-stick cooking spray, or if I’m feeling a little old-school, I’ll take a small pat of butter and spread it around with a paper towel. This little bit of preparation ensures that our delightful Pumpkin Dump Cake won’t stick, making serving a breeze later on. It’s all about setting ourselves up for success from the very beginning, don’t you agree?
Crafting the Creamy Pumpkin Layer: The Heart of Your Dump Cake
-
Combine the Wet Ingredients for the Pumpkin Base:
Now, this is where the magic truly begins to happen! In a large mixing bowl, I carefully spoon in the entire 15-ounce can of pure pumpkin puree. Please be sure it’s pure pumpkin puree and not pumpkin pie filling, as the latter already has sugar and spices added, which would throw off our recipe’s balance. Once the pumpkin is in, I pour in the 12-ounce can of evaporated milk. The evaporated milk is key here; it lends a wonderful creaminess and richness that regular milk just can’t quite achieve, giving our pumpkin layer that luxurious, custard-like texture. -
Sweeten and Spice Things Up:
Next, I add the sugars – a full cup of granulated sugar and a half cup of packed light brown sugar. The combination of both sugars creates a deeper, more complex sweetness that truly complements the earthy flavor of the pumpkin. After that, it’s time for the spices! I sprinkle in two teaspoons of ground cinnamon, one teaspoon of ground nutmeg, a half teaspoon of ground ginger, and a quarter teaspoon of ground cloves. This blend of warm, autumnal spices is what gives the Pumpkin Dump Cake its iconic, comforting aroma and taste. I just love how the scent starts to fill the kitchen even before it hits the oven! -
Incorporate Eggs and Vanilla for Richness and Flavor:
Once the sugars and spices are in, I crack in two large eggs. These eggs are essential; they act as a binding agent, helping to set the pumpkin mixture as it bakes, transforming it into that beautiful, smooth custard. I also add one teaspoon of vanilla extract, which always enhances all the other flavors, giving everything a lovely depth. Finally, I add a half teaspoon of salt. Don’t skip the salt! Even in a sweet dish, a touch of salt is vital for balancing the flavors and making everything taste brighter and more vibrant. -
Whisk Until Smooth and Silky:
With all the ingredients for our pumpkin layer now in the bowl, I grab a whisk and get to work. I whisk everything together thoroughly, making sure there are no lumps of pumpkin or streaks of spice. I want the mixture to be completely smooth, uniform in color, and well-aerated. I usually spend a good two to three minutes whisking, scraping down the sides of the bowl with a spatula occasionally to ensure every last bit is incorporated. This careful mixing is what ensures a perfect, consistent texture in your finished Pumpkin Dump Cake. -
Pour the Pumpkin Mixture into the Prepared Dish:
Once I’m satisfied with the smoothness of my pumpkin mixture, I carefully pour it into the greased 9×13-inch baking dish that I prepared earlier. I use my spatula to scrape out every last drop from the bowl, because every bit of that delicious pumpkin goodness counts! I then gently tilt the dish back and forth a few times, or use the back of my spatula, to ensure the pumpkin layer is spread evenly across the bottom. This forms the foundational layer for our wonderful Pumpkin Dump Cake.
The “Dump” Part: Layering the Cake Mix and Butter for that Irresistible Topping
-
Evenly Sprinkle the Dry Cake Mix:
Now for the “dump” part of the Pumpkin Dump Cake! This is perhaps the easiest and most satisfying step. I open my box of yellow cake mix (or spice cake mix if I’m feeling adventurous and want an extra layer of warm spice). With a steady hand, I begin to sprinkle the dry cake mix evenly over the entire surface of the pumpkin layer in the baking dish. It’s absolutely crucial that you do not mix the cake mix into the pumpkin layer. This is meant to be a separate, distinct layer that will transform into a delightful, crumbly cake topping as it bakes. I try to make sure there are no large clumps and that the pumpkin layer is almost completely covered. Don’t worry if a tiny bit of pumpkin shows through; the key is an even distribution. -
Arrange the Butter Slices or Drizzle Melted Butter:
This step is where the magic truly unfolds, creating that buttery, cake-like crust. I have two preferred methods here, and both work beautifully:- Method A: Thin Butter Slices (My Personal Favorite for Evenness): If I’m using solid butter, I take my two sticks of unsalted butter and cut them into very thin slices, almost like small pats. The thinner the slices, the better! I then carefully arrange these butter slices over the entire surface of the dry cake mix. I try to ensure that the butter slices are placed as close together as possible, covering as much of the dry mix as I can without overlapping too much. As the butter melts in the oven, it will seep down into the dry cake mix, creating a rich, golden, and slightly crispy topping. This method, I find, often leads to a more consistently moist and crumbly top crust.
- Method B: Drizzling Melted Butter (Quicker, but Requires Care): Alternatively, I can melt my two sticks of unsalted butter in a microwave-safe bowl or a small saucepan. Once melted, I slowly and evenly drizzle the liquid butter over the entire surface of the dry cake mix. I try to get an even coating, ensuring that no large sections of dry mix are left completely untouched. While this method is a bit faster, I sometimes find it can be slightly trickier to achieve the absolute perfect, even saturation compared to the sliced butter method. Either way, the butter is essential for transforming the dry mix into a glorious, golden-brown crust!
Why so much butter? The butter is what provides the fat and moisture necessary to bake the dry cake mix into a delicious, crumbly cake layer right on top of our pumpkin custard. It’s absolutely vital for the texture and flavor of the finished Pumpkin Dump Cake.
-
Sprinkle with Optional Nuts (But Highly Recommended!):
If you’re a fan of a little extra crunch and nutty flavor, this is the moment to add your chopped pecans or walnuts. I love to sprinkle about one cup of these nuts evenly over the butter layer. They toast beautifully in the oven, adding a wonderful texture and a subtle nutty note that complements the pumpkin and spices perfectly. If you’re not a nut person, no worries, your Pumpkin Dump Cake will still be absolutely divine without them!
Baking to Golden Perfection: The Grand Finale of Your Pumpkin Dump Cake
-
Bake Your Pumpkin Dump Cake:
Now, it’s time for the oven to do its work! I carefully place the baking dish into my preheated 350°F (175°C) oven. The baking time will typically range from 50 to 60 minutes. As it bakes, a truly wonderful transformation occurs. The pumpkin layer underneath will set and become a creamy, spiced custard, while the butter will melt into the dry cake mix, turning it into a beautiful, golden-brown, crumbly cake topping.Tips for Checking for Doneness:
I usually start checking around the 50-minute mark. You’ll know it’s ready when the top is gloriously golden brown and the edges of the cake layer look slightly crisp. If you gently jiggle the dish, the center of the pumpkin layer underneath should be mostly set, with just a slight, very subtle jiggle remaining, much like a perfectly baked custard or cheesecake. If the top seems to be browning too quickly before the pumpkin layer is set, you can loosely tent the dish with aluminum foil for the last 10-15 minutes of baking.
-
Cooling is Crucial: Patience, My Friend!
Once your Pumpkin Dump Cake emerges from the oven, looking absolutely magnificent and smelling divine, it’s incredibly tempting to dive right in. However, for the best results, cooling is an essential step that cannot be rushed. I place the hot dish on a wire rack and allow it to cool completely. This usually takes at least 1 to 2 hours at room temperature, sometimes even longer. As it cools, the pumpkin layer continues to set and firm up, achieving that perfect custard-like consistency. If you cut into it too soon, it might be a bit too gooey, though still delicious! I often find that patience truly is a virtue with this dessert, as the flavors also meld and deepen as it cools.
Serving My Delightful Pumpkin Dump Cake: The Sweet Reward
-
Slice and Serve Your Delicious Pumpkin Dump Cake:
After your Pumpkin Dump Cake has cooled sufficiently, it’s finally time to enjoy the fruits of your labor! I grab a sharp knife and cut the cake into generous squares. This dessert is wonderfully rich and satisfying on its own, but it truly shines when paired with certain accompaniments.My Favorite Serving Suggestions:
- A Dollop of Whipped Cream: This is a classic pairing for a reason! A generous dollop of freshly whipped cream adds a lightness and a creamy texture that perfectly contrasts with the rich, dense cake. Sometimes, I even add a tiny pinch of cinnamon or a splash of vanilla to my whipped cream for an extra touch of flavor.
- A Scoop of Vanilla Ice Cream: For those who love a warm-and-cold dessert experience, a scoop of good quality vanilla bean ice cream melting slightly over a warm (or slightly reheated) slice of Pumpkin Dump Cake is pure heaven. The cold creaminess of the ice cream against the warm, spiced cake is an unforgettable sensation.
- A Drizzle of Caramel Sauce: If you’re feeling extra indulgent, a light drizzle of store-bought or homemade caramel sauce over the top adds another layer of decadent sweetness and a beautiful visual appeal.
- A Dusting of Powdered Sugar: For a simple yet elegant finish, a light dusting of powdered sugar through a fine-mesh sieve can make your slices look professionally prepared.
No matter how you choose to serve it, I promise your homemade Pumpkin Dump Cake will be a showstopper and a crowd-pleaser!
-
Storing Leftovers (If There Are Any!):
If, by some miracle, you have any leftovers of this incredible Pumpkin Dump Cake, they store beautifully. I cover the baking dish tightly with plastic wrap or aluminum foil and refrigerate it. It will stay fresh and delicious for 3 to 4 days. In fact, some people, myself included, find that the flavors deepen and become even more wonderful the next day, making it a fantastic make-ahead dessert for gatherings. You can enjoy it cold straight from the fridge, or gently warm individual slices in the microwave for a few seconds if you prefer it warm.

Conclusion:
Well, my friends, we’ve come to the end of our delicious journey, and I truly hope you’re as excited about this recipe as I am! If there’s one dessert that perfectly encapsulates comforting simplicity and incredible flavor, it’s this one. It’s truly a game-changer for anyone looking for a show-stopping treat without the usual kitchen fuss. This isn’t just another dessert; it’s an experience waiting to happen, promising to deliver smiles with every single bite. The joy it brings to the table, coupled with its astonishing ease of preparation, makes it an absolute must-try for any occasion, big or small. From casual weeknight desserts to impressive holiday feasts, this recipe gracefully adapts, always delivering on its promise of rich, satisfying taste.
Why This Pumpkin Dump Cake is Your Next Favorite Dessert:
What makes this particular recipe so incredibly special, you ask? For starters, it’s the sheer effortlessness of its creation. You don’t need to be a seasoned baker to achieve spectacular results here. The magic of this particular Pumpkin Dump Cake unfolds almost on its own, layering rich, autumnal flavors with a wonderfully crisp, buttery topping. It’s the kind of dessert that looks impressive, tastes divine, but secretly demands very little from you in terms of time or complex techniques. Imagine the warmth of spices like cinnamon, nutmeg, and ginger, perfectly balanced with the sweet, earthy notes of pumpkin, all beneath a golden-brown crumble that offers a delightful textural contrast. This isn’t just a dessert; it’s a sensory delight, bringing the cozy essence of fall and winter right into your home, making it an ideal choice for holiday gatherings, potlucks, or simply a comforting evening indulgence. This dessert truly shines because it delivers gourmet taste with minimal stress, allowing you to spend less time in the kitchen and more time enjoying the company of your loved ones. It’s a testament to the fact that sometimes, the simplest recipes yield the most profound culinary joy. I promise you, one taste of this divine creation and you’ll understand why I can’t stop raving about its effortless perfection and comforting appeal. Its unique blend of textures and deeply satisfying flavors will undoubtedly secure its place as a cherished favorite in your recipe collection.
But the deliciousness doesn’t stop once it’s out of the oven! One of the joys of this dessert is its incredible versatility when it comes to serving. While it’s absolutely spectacular on its own, warm from the oven, there are so many ways to elevate the experience. My personal favorite way to enjoy it is with a generous scoop of vanilla bean ice cream; the cold, creamy contrast against the warm, spiced cake is simply heavenly. A dollop of freshly whipped cream, perhaps infused with a hint of maple syrup or a dash of bourbon, also works wonders, adding an extra layer of richness and elegance. For those who love a bit of crunch, a sprinkle of toasted pecans or walnuts over the top just before serving adds a fantastic texture and nutty depth that perfectly complements the soft cake beneath. Don’t be afraid to experiment with a drizzle of caramel sauce or even a light dusting of powdered sugar for an extra touch of sweetness and visual appeal. If you’re feeling adventurous, consider a slight variation in the recipe itself for future batches: perhaps a touch of ginger paste in the pumpkin layer for an extra zing, or a different type of cake mix like a spice cake mix instead of yellow for a deeper flavor profile. This adaptability means you can tailor it to any occasion or preference, making it a truly versatile centerpiece for your dessert table that will impress everyone.
So, what are you waiting for? I wholeheartedly encourage you to roll up your sleeves – metaphorically, because there’s hardly any actual rolling involved here! – and give this incredible Pumpkin Dump Cake recipe a try this week. You won’t regret it. It’s a fantastic way to impress your guests, treat your family, or simply indulge in a moment of well-deserved culinary bliss yourself. Once you’ve experienced the magic of this easy-to-make, utterly delicious dessert, I would absolutely love to hear all about it! Did you add a special twist? What were your serving suggestions for your delightful creation? Please come back and share your experiences, tips, and triumphs in the comments below. Your feedback and creativity inspire me and our entire community of fellow food lovers. Let’s make some delicious memories together, one unforgettable slice at a time!
Easy Pumpkin Dump Cake Recipe – Delicious & Quick Dessert
Pumpkin Dump Cake is one of those dessert miracles that seems almost too good to be true. Imagine a dish that delivers all the comforting flavors of autumn—rich, spiced pumpkin custard topped with a golden, buttery cake crust—all with minimal effort and maximum reward.
Ingredients
Instructions
Important Information
Nutrition Facts (Per Serving)
It is important to consider this information as approximate and not to use it as definitive health advice.
Allergy Information
Please check ingredients for potential allergens and consult a health professional if in doubt.


Leave a Comment