Christmas Puppy Chow is more than just a holiday snack; it’s a sprinkle-covered, powdered-sugar dream that captures the magic of the festive season in every irresistible bite. Have you ever wished for a delectable, no-bake treat that brings smiles to every face at your holiday gathering without hours of effort? Then you’ve come to the right place!
A Beloved Holiday Tradition in the Making!
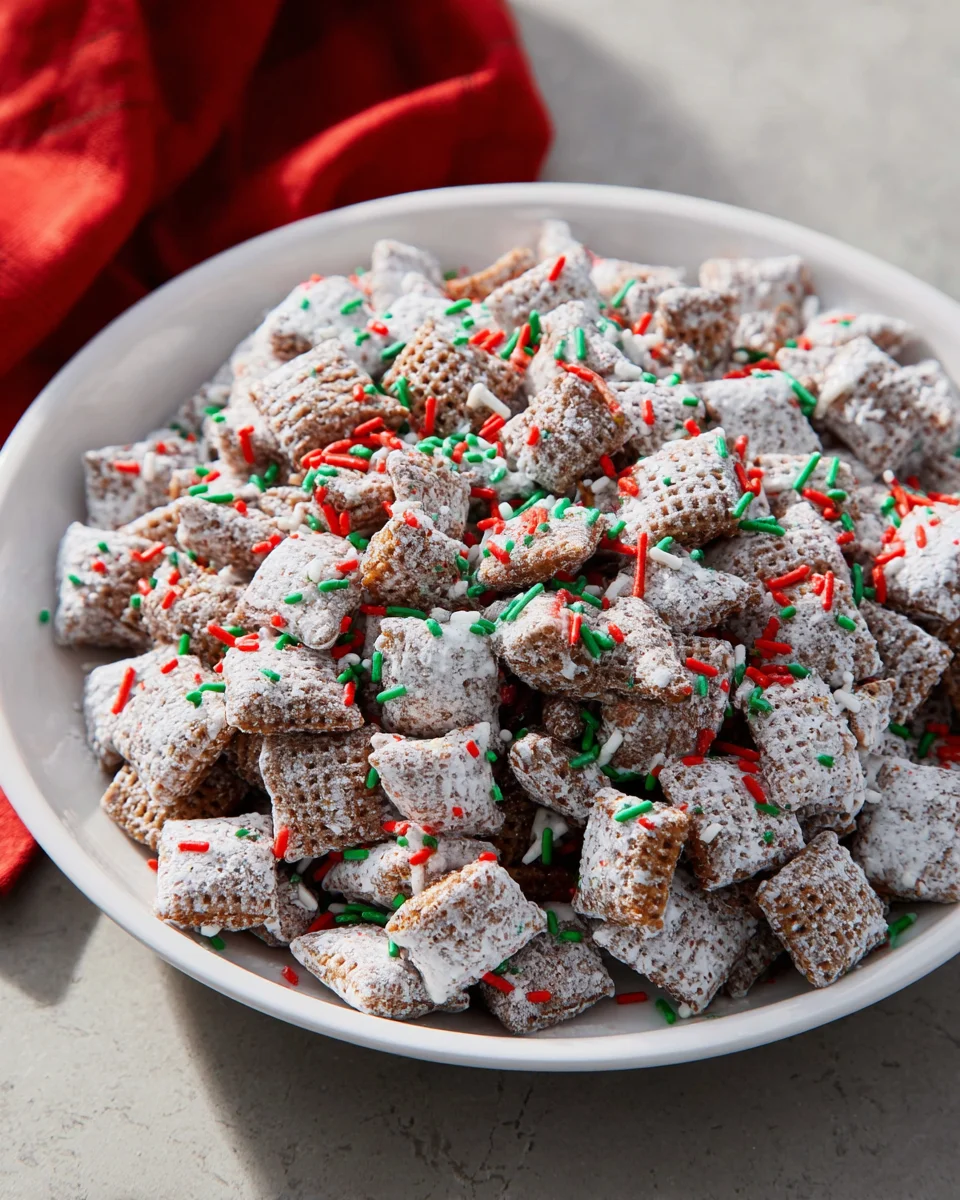
This beloved American classic, often known as Muddy Buddies, has been a staple at parties and potlucks for decades, cherished for its delightful crunch and addictive blend of sweet and savory. But when the calendar flips to December, this humble treat transforms into something truly special: a vibrant, festive Christmas Puppy Chow. People adore this dish for countless reasons. Its genius lies in the perfect marriage of crispy cereal coated in a rich, warm chocolate and peanut butter mixture, generously dusted with a snowy blanket of powdered sugar. Add a touch of holiday cheer with red and green candies or sprinkles, and you have a visually stunning and incredibly delicious confection that simply screams “happy holidays.” It’s remarkably easy to prepare, making this Christmas Puppy Chow the ideal stress-free dessert for busy holiday entertaining, ensuring you spend less time in the kitchen and more time enjoying the festive spirit with loved ones. I promise, once you try this festive delight, it will become a cherished part of your annual holiday traditions.

Ingredients:
- 9 cups Rice Chex Cereal: I always recommend using Rice Chex for this Christmas Puppy Chow recipe because its light, crispy texture and subtle flavor really allow the delicious coatings to shine. You could try Corn Chex if you prefer, but I find Rice Chex holds up better without getting soggy and provides the perfect canvas for our festive creation. Make sure you have enough; nine cups is quite a bit, so usually a standard large box is just right.
- 1 bag (12 ounces) Semi-Sweet Chocolate Chips: Good quality chocolate chips are key here! I usually go for a well-known brand as they melt more smoothly and provide a richer flavor profile. Semi-sweet is my go-to, as it offers a nice balance between sweetness and the deep cocoa notes, which is essential for our Christmas Puppy Chow. If you’re feeling adventurous, you could try milk chocolate for a sweeter treat, but semi-sweet is a classic for a reason.
- 1/2 cup Creamy Peanut Butter: Opt for a smooth, creamy peanut butter. Avoid the natural, oily kinds that separate easily, as they can make the coating greasy and harder to work with. Regular creamy peanut butter, like Jif or Skippy, works best for achieving that perfectly smooth and luscious texture in your coating. This ingredient is fundamental to the traditional Puppy Chow flavor, and it pairs beautifully with the chocolate.
- 1/4 cup Unsalted Butter: Using unsalted butter gives you more control over the overall saltiness of your Christmas Puppy Chow. If you only have salted butter, you can use it, but I’d recommend slightly reducing any additional salt if you were planning to add some (which we aren’t for this recipe, so unsalted is just safer). This butter helps create a wonderfully smooth and pliable chocolate mixture that coats the cereal beautifully.
- 1 teaspoon Vanilla Extract: Pure vanilla extract is a must! It adds a touch of warmth and enhances all the other flavors, bringing a delightful aromatic note to the Christmas Puppy Chow. Don’t skimp on this; a good quality vanilla extract makes a surprising difference to the depth of flavor.
- 1 1/2 cups Powdered Sugar (Confectioners’ Sugar): This is what gives our Christmas Puppy Chow its signature “snow-dusted” look and contributes to its irresistible sweetness and unique texture. Make sure it’s fresh and free of clumps. If it’s lumpy, give it a quick sift before using. You might even want a little extra on hand just in case you want a heavier coating.
- 1 cup Red and Green M&M’s: These are our primary festive touch! The vibrant red and green colors instantly scream “Christmas.” They also add a lovely crunch and a burst of chocolatey goodness. Make sure to use regular M&M’s, not the mini ones, so they stand out in the mix.
- 1/2 cup Festive Christmas Sprinkles: Think red, green, and white sprinkles, or even fun holiday shapes like stars or trees. These are purely for decoration and extra festive flair, making your Christmas Puppy Chow truly eye-catching and perfect for holiday gatherings. I love how they add that extra sparkle!
Preparing the Chocolate & Peanut Butter Coating
- Measure Your Cereal: First things first, get a very large mixing bowl – I’m talking about your biggest one, or even a roasting pan if you have it. Gently pour in your 9 cups of Rice Chex cereal. You want to handle the cereal with care at this stage to avoid crushing it. Set it aside for now. This will be the base for our delicious Christmas Puppy Chow.
- Combine Chocolate Mixture Ingredients: Now, let’s get that glorious coating ready. In a medium, microwave-safe bowl, combine the semi-sweet chocolate chips, creamy peanut butter, and unsalted butter. I prefer using a glass bowl because it heats more evenly.
-
Melt the Mixture: This is a crucial step for achieving a smooth, luxurious coating. You have two excellent options here:
- Microwave Method (My Preferred Way for Speed and Ease): Place the bowl into the microwave and heat on high for 30 seconds. Remove and stir well with a rubber spatula. You’ll notice the chocolate chips and butter starting to soften. Repeat this process, heating in 15-second intervals, stirring vigorously after each interval, until the mixture is completely smooth and melted. This usually takes me about 1 to 2 minutes total, but microwave wattages vary, so keep a close eye on it. It’s important not to overheat the chocolate, as it can seize up and become grainy. You want it just melted enough so that it’s glossy and pourable. The residual heat will continue to melt any small lumps as you stir.
- Stovetop Method (Great for More Control): If you prefer not to use a microwave, or if you’re making a double batch, you can use a double boiler or a heat-safe bowl set over a pot of simmering water. Place the chocolate chips, peanut butter, and butter in the top part of the double boiler (or the bowl). Ensure the bottom of the bowl does not touch the simmering water. Stir constantly until the mixture is completely melted and smooth. This method offers excellent control and minimizes the risk of burning, though it takes a little longer.
- Stir in Vanilla Extract: Once your chocolate and peanut butter mixture is perfectly smooth and free of any lumps, remove it from the heat (or microwave). Stir in the vanilla extract. The vanilla adds a beautiful depth of flavor that really makes the Christmas Puppy Chow sing. Give it a good stir until the vanilla is fully incorporated. You should now have a rich, glossy, and wonderfully fragrant chocolate-peanut butter coating that’s ready for the cereal.
Coating the Cereal
- Pour Coating Over Cereal: Take your large bowl of Rice Chex cereal. Slowly and evenly pour the warm, melted chocolate-peanut butter mixture over the cereal. Try to distribute it as evenly as possible as you pour, but don’t worry too much about perfect coverage at this stage; we’ll get there.
-
Gently Toss to Coat: Now for the delicate part! Using your large rubber spatula or a sturdy spoon, very gently fold and toss the cereal. The goal here is to coat every single piece of cereal with the chocolate mixture without crushing the delicate Chex squares.
- Technique Tip: I find it works best to scoop from the bottom of the bowl and bring the coated cereal up over the dry cereal on top. Keep folding and tossing, rotating the bowl as you go, until all the cereal pieces appear to be covered. This process might take a few minutes, so be patient. You want to see that glossy chocolate mixture clinging to every nooks and cranny of the Chex. Don’t rush this step; proper coating is key to a delicious Christmas Puppy Chow.
- Why Gentle Tossing is Important: If you’re too vigorous, you’ll end up with a bowl full of crushed cereal and a clumpy mess, which is certainly not the delightful texture we’re aiming for for our Christmas Puppy Chow! The goal is distinct, coated pieces.
The Powdered Sugar Magic
- Prepare for Shaking: This step is where the “snow-dusted” effect of Christmas Puppy Chow comes to life! You’ll need a very large zip-top plastic bag (a 2.5-gallon size is ideal if you can find one, otherwise, use two 1-gallon bags and split the coated cereal). Alternatively, you can use a very large paper grocery bag, though I prefer the clear plastic bag so I can see the magic happening. Pour the powdered sugar into the bag.
- Add Coated Cereal: Carefully transfer about half of your chocolate-coated cereal into the bag with the powdered sugar. If you’re using two bags, divide the cereal and powdered sugar evenly.
-
Shake, Shake, Shake!: Seal the bag tightly, making sure there’s plenty of air inside the bag to allow the cereal to tumble freely. Now, hold the top of the bag securely and gently shake the bag. Toss it, rotate it, and shake it for a good minute or two. You want every single piece of cereal to be thoroughly coated in that beautiful white powdered sugar.
- Visual Cue: You’ll see the dark chocolate-coated cereal transform into lovely, snow-covered pieces. The powdered sugar should stick to the chocolate layer, creating that iconic messy-but-delicious puppy chow look. If you notice any patches of uncovered chocolate, keep shaking gently until everything is perfectly white. Don’t be shy with the shaking, but remember to keep it gentle enough not to pulverize the cereal.
- Why Powdered Sugar is Essential: This coating isn’t just for looks; it adds another layer of sweetness and provides a lovely, slightly messy texture that is characteristic of the best Christmas Puppy Chow.
- Transfer to a Tray: Once fully coated, gently pour the powdered-sugar-dusted Christmas Puppy Chow out onto a large baking sheet lined with parchment paper or wax paper. Spread it out in a single layer if possible. Repeat the process with the remaining half of the coated cereal and powdered sugar.
Adding Festive Touches and Setting
- Add the Christmas Candies and Sprinkles: While the puppy chow is still slightly warm and before it fully sets, sprinkle the red and green M&M’s and the festive Christmas sprinkles evenly over the puppy chow spread on the baking sheet. The slight warmth of the puppy chow helps the smaller sprinkles adhere better. If you wait too long, they might not stick as well. Gently toss everything together with your hands or a spatula to ensure the candies and sprinkles are well distributed throughout the Christmas Puppy Chow. This is where your Christmas Puppy Chow truly comes to life with vibrant colors!
-
Allow to Set: Let the Christmas Puppy Chow cool completely. This is a crucial step to ensure the chocolate coating firms up and the pieces separate nicely. You can leave it at room temperature for about an hour, or for quicker setting, pop the baking sheets into the refrigerator for 15-30 minutes. Once cooled, the chocolate will be firm, and the pieces will be less sticky and easier to handle.
- Why Setting is Important: If you try to store or serve it before it’s fully set, the pieces will stick together excessively, and the coating might feel too soft. A properly set Christmas Puppy Chow will have distinct, sturdy pieces.
Storage and Serving Tips
-
Storing Your Christmas Puppy Chow: Once completely cooled and set, transfer your beautiful Christmas Puppy Chow to an airtight container. I like to use large plastic storage bins with tight-fitting lids. You can store it at room temperature for up to a week. If your home is particularly warm, or if you want to extend its freshness, you can store it in the refrigerator for up to two weeks. Just be aware that chilling can make the chocolate coating a little firmer, which some people prefer!
- Layering for Freshness: If you’re using a very large container, you can layer the puppy chow between sheets of parchment paper to help prevent sticking, though if it’s properly cooled, this usually isn’t necessary. The key is truly airtight storage to keep it from getting stale.
- Gifting Idea: Christmas Puppy Chow makes a fantastic edible gift! Package it in clear cellophane bags tied with festive ribbons, or fill decorative holiday tins. It’s always a hit with friends and family during the holiday season.
-
Serving Suggestions:
- As a Party Snack: Simply place a large bowl of Christmas Puppy Chow out at your holiday gathering. It’s incredibly easy for guests to grab a handful, and it’s always one of the first things to disappear!
- Dessert Topping: Get creative! Sprinkle Christmas Puppy Chow over vanilla ice cream for an extra festive crunch. It’s also surprisingly good as a topping for yogurt parfaits if you want a playful breakfast treat.
- Lunchbox Treat: Pack a small handful in lunchboxes for a delightful surprise for kids and adults alike.
-
Troubleshooting Common Issues:
- Chocolate Mixture Too Thick: If your chocolate and peanut butter mixture feels too thick to pour smoothly, you can return it to the microwave for another 10-15 seconds (or over the simmering water) and stir again. A little warmth helps loosen it up. Just be careful not to overheat!
- Cereal Clumping Together: This often happens if the chocolate mixture is too hot or if the puppy chow isn’t spread out enough to cool properly. If you find large clumps after coating with powdered sugar, gently break them apart with your hands once the puppy chow has fully cooled. A little clumping is natural for Christmas Puppy Chow, but excessive clumping can be managed.
- Powdered Sugar Not Sticking: This usually means the chocolate coating has cooled too much before you added it to the powdered sugar. If this happens, you can lightly mist the puppy chow with a fine spray of water (just a tiny bit!) and then toss it with more powdered sugar. However, it’s best to work quickly once the cereal is coated in chocolate to ensure maximum adhesion for that snowy look.
- Enjoy Your Christmas Puppy Chow! This delightful treat is truly a highlight of the holiday season for me. It’s so simple to make, incredibly satisfying, and always brings a smile to everyone’s face. I hope you enjoy making and sharing this festive batch of Christmas Puppy Chow as much as I do! It’s the perfect sweet snack to enjoy during movie nights, holiday parties, or just as a cozy treat at home.
Conclusion:
As we wrap up our delicious journey, I hope you’re feeling as excited as I am about this incredible recipe. What we’ve explored today isn’t just another snack; it’s a revelation in simplicity and satisfaction, truly deserving of a permanent spot in your culinary repertoire. I genuinely believe this recipe is an absolute must-try for everyone, from seasoned bakers to complete kitchen novices, because it delivers maximum impact with minimal fuss. The sheer joy of creating something so utterly delightful with such ease is profoundly rewarding. It’s the kind of treat that doesn’t just satisfy a sweet craving; it brings a genuine smile to everyone’s face, whether they’re making it or simply enjoying a handful.
Think about the last time you found a recipe that could be whipped up in minutes, required no oven, and tasted like it came straight from a gourmet bakery. That’s precisely what we have here! The harmonious blend of textures—the crispiness of the cereal, the smooth richness of the chocolate and peanut butter coating, all dusted with that iconic powdery sweetness—creates an irresistible sensory experience. It’s comforting, nostalgic, and utterly addictive in the best possible way. This isn’t merely a treat; it’s an experience, a memory in the making, and a testament to how simple ingredients can combine to create something truly magical.
Now, let’s talk about making this delightful creation even more special and how you can truly make it your own. While it’s perfect straight from the bowl, don’t hesitate to get creative with your serving. For a party, consider arranging it in festive paper cones or small, decorative bowls scattered around your dessert table. It also makes for an incredibly thoughtful and charming edible gift; simply scoop portions into clear cellophane bags tied with a pretty ribbon, or layer it in small glass jars for a rustic, homemade touch. Imagine the delight of your friends and family receiving a jar of this homemade goodness during the holiday season or as a thank-you treat! It’s also fantastic for movie nights, road trips, or as a quick pick-me-up during a busy workday.
Unleash Your Creativity with Variations!
The beauty of this recipe lies in its versatility. While the classic combination is unbeatable, feel free to experiment! For a deeper, richer chocolate flavor, you could try using dark chocolate chips in addition to or instead of milk chocolate. If you’re feeling adventurous, swap out some of the peanut butter for almond butter or cashew butter to create a slightly different nutty profile, perfect for those with varied preferences. You could also incorporate different mix-ins after the coating process but before the final dusting. Think miniature marshmallows, pretzel pieces for an extra salty crunch, or even a handful of M&M’s for a burst of color and chocolatey goodness.
For a truly seasonal twist beyond just the festive dust, consider adding a pinch of cinnamon or a tiny dash of pumpkin pie spice to the chocolate mixture before melting. This subtle addition elevates the flavor profile and adds an extra layer of warmth that is simply divine. And speaking of seasonality, while it’s absolutely phenomenal year-round, adding red and green candy melts into your coating, or using corresponding festive sprinkles on top, transforms it into the quintessential holiday snack. That’s right, this amazing Christmas Puppy Chow truly shines during the festive season, becoming a vibrant, joyful centerpiece for any gathering, easily customized to match your holiday theme.
Your turn to create magic! I can’t emphasize enough how much I encourage you to whip up a batch of this fantastic treat very, very soon. It’s more than just a recipe; it’s an invitation to create joy, to share deliciousness, and to make wonderful memories. Don’t let its simplicity fool you into thinking it’s anything less than spectacular. It’s the perfect antidote to a busy day, a wonderful project to do with kids, or simply a delightful indulgence for yourself.
Once you’ve experienced the pure delight of making and tasting it, please, please share your experience! Did you add a unique twist? Was it a hit at your latest gathering? I absolutely love hearing about your kitchen adventures and how my recipes become a part of your homes. So grab your ingredients, gather your enthusiasm, and prepare to be amazed by how effortlessly delicious homemade treats can be. You won’t regret diving into this bowl of pure happiness!
Christmas Puppy Chow
Christmas Puppy Chow (also known as Muddy Buddies) is a sprinkle-covered, powdered-sugar dream that captures the magic of the festive season in every irresistible bite. This no-bake treat features crispy cereal coated in a rich, warm chocolate and peanut butter mixture, generously dusted with powdered sugar, and adorned with festive sprinkles. It’s an easy-to-make, visually stunning, and incredibly delicious confection perfect for holiday gatherings.
Ingredients
Instructions
Important Information
Nutrition Facts (Per Serving)
It is important to consider this information as approximate and not to use it as definitive health advice.
Allergy Information
Please check ingredients for potential allergens and consult a health professional if in doubt.


Leave a Comment