Chocolate Covered Strawberry Turkeys – a phrase that immediately brings a smile to my face, promising both whimsy and delectable sweetness. As the autumn leaves fall and the spirit of gratitude fills the air, I find myself drawn to recipes that not only taste incredible but also add a touch of charm and personality to our holiday tables. While turkeys traditionally feature as the savory centerpiece of Thanksgiving, I’m here to introduce you to a delightful confection that’s poised to become your new favorite dessert showstopper: a clever, edible twist that celebrates the season in the most adorable way imaginable.
There isn’t a long-lost ancient history behind these particular feathered friends, but they represent a wonderful modern tradition of transforming simple ingredients into edible art, perfect for creating joyous memories with family and friends. What began as a creative internet sensation has rapidly evolved into a cherished activity for parents and children alike during the festive season. People absolutely adore this dish because it perfectly marries the lusciousness of ripe, juicy strawberries with the rich indulgence of chocolate, all while presenting itself in an irresistibly cute, holiday-themed package. These Chocolate Covered Strawberry Turkeys are not just a treat; they’re an experience that delights both the eyes and the palate. They offer a refreshing, lighter alternative to heavier, traditional pies, providing a fruity, decadent, and visually stunning option that appeals to all ages. Get ready to impress everyone at your gathering with these delightful edible characters!
Ingredients:
- 1.5 pounds (approximately 24-30) large, firm, fresh strawberries: Choose strawberries that are vibrant red, firm to the touch, and have their green caps intact. These will form the body of our adorable chocolate covered strawberry turkeys.
- 12 ounces high-quality milk chocolate melting wafers or chocolate chips: Opt for melting wafers or compound chocolate as they temper beautifully and set with a lovely shine without special tempering techniques. If using chips, ensure they are good quality for better melting.
- 6 ounces high-quality dark chocolate melting wafers or chocolate chips: A slightly darker chocolate will provide a nice contrast and depth of flavor. Again, melting wafers are highly recommended for ease of use.
- 4 ounces high-quality white chocolate melting wafers or chocolate chips: This will be used for delightful accents and “glue” for our turkey features. White chocolate can be a bit trickier to melt, so pay extra attention!
- 1-2 teaspoons shortening or refined coconut oil (optional): This is a secret weapon to help thin out your melted chocolate if it’s too thick, ensuring a smoother, more even coating on your chocolate covered strawberry turkeys.
- Mini candy eyeballs: These are absolutely essential for giving our chocolate covered strawberry turkeys their charming, expressive faces! You can find these in most baking aisles or craft stores.
- Candy corn: A classic autumnal candy, candy corn will serve as the perfect material for both the beaks and the festive tail feathers of your strawberry turkeys. You’ll want to select pieces with distinct white, orange, and yellow sections.
- Thin pretzel sticks or small pretzel snaps: These will form the proud tail feathers of our chocolate covered strawberry turkeys. You can use whole sticks or break them into smaller, more manageable pieces.
- Festive sprinkles (optional): Small autumn-themed sprinkles, nonpareils, or even edible glitter can add an extra touch of sparkle and festivity to your chocolate covered strawberry turkeys.
Gathering and Preparing Your Ingredients
Alright, my friends, let’s get ready to create some truly show-stopping chocolate covered strawberry turkeys! The first and most crucial step for any successful baking or decorating project is meticulous preparation. Trust me, a little organization now will save you a lot of stress later.
- Wash and Thoroughly Dry Your Strawberries: This is a non-negotiable step. I cannot stress this enough – your strawberries must be completely, utterly, and absolutely dry. Moisture is the enemy of melted chocolate; even a tiny drop can cause your chocolate to seize and become grainy. Gently wash your beautiful strawberries under cool running water, making sure to keep the green caps intact. Then, lay them out on a clean kitchen towel or several layers of paper towels. Pat each one dry individually, and then let them air dry for at least 30 minutes, or even an hour, turning them occasionally. I often place them on a wire rack over a baking sheet to ensure air circulates all around them. You want them to be so dry, they squeak! This painstaking drying process ensures your chocolate adheres beautifully and smoothly, creating a perfect canvas for our chocolate covered strawberry turkeys.
- Prepare Your Workstation: While your strawberries are drying, get your workspace ready. Cover a large baking sheet with parchment paper or a silicone baking mat. This will be the landing strip for your dipped strawberries as they set. Have several small bowls ready for your candy eyes, candy corn, and pretzels. This way, everything is within arm’s reach when you start assembling, which is key because you’ll often be working with chocolate that is still wet.
- Pre-Sort Candy Components: If you’re using full candy corn pieces for tail feathers, you might want to break off the yellow tips for the beaks now. For the pretzel tails, decide if you want to use full pretzel sticks for a more dramatic tail or break them into smaller, more uniform pieces for a neater look. Having these small components ready to go will make the assembly phase much smoother and quicker. I personally like to use full pretzel sticks and arrange them in a fanned-out fashion for a truly majestic turkey tail!
Melting the Chocolate Magic
Now comes the truly magical part: transforming solid chocolate into a silky, molten dream! This is where we lay the foundation for our incredible chocolate covered strawberry turkeys. Patience and attention to detail are your best friends here.
- The Double Boiler Method (My Preferred Way): For me, the double boiler is the gold standard for melting chocolate. It provides gentle, even heat, significantly reducing the risk of scorching.
- Fill a saucepan with about 1-2 inches of water and bring it to a gentle simmer over medium-low heat.
- Place a heat-proof bowl (glass or stainless steel works best) over the saucepan, ensuring the bottom of the bowl does not touch the simmering water. It’s the steam that does the work, not direct water contact.
- Add your milk chocolate melting wafers (or chips) to the bowl. Stir continuously with a rubber spatula or spoon. You’ll notice the chocolate slowly beginning to melt around the edges. Keep stirring gently until the chocolate is smooth, glossy, and completely melted, with no lumps remaining. This usually takes about 5-8 minutes.
- Once melted, remove the bowl from the heat, but leave it over the warm (but not simmering) water to help keep the chocolate fluid while you work. If the chocolate seems a bit too thick for easy dipping, stir in ½ to 1 teaspoon of shortening or refined coconut oil until fully incorporated and smooth. This will give it that perfect, pourable consistency for coating your chocolate covered strawberry turkeys.
- The Microwave Method (A Quicker Alternative): If you’re short on time, the microwave can be your friend, but it requires more vigilance.
- Place your milk chocolate wafers in a microwave-safe bowl.
- Microwave on 50% power in 30-second intervals, stirring thoroughly after each interval. This is key! Chocolate retains its shape even when melted, so you need to stir to gauge its true consistency and prevent scorching.
- Continue microwaving and stirring until the chocolate is mostly melted and smooth. Be extremely careful not to overheat it, as scorched chocolate is irreversible and unusable. Again, if it needs thinning, add a touch of shortening or coconut oil.
- Melt All Chocolates Separately: Repeat the melting process for your dark chocolate and white chocolate, using separate clean bowls for each.
- A special note on white chocolate: White chocolate is often more temperamental than milk or dark chocolate because it contains a different fat composition. It can seize or burn more easily. So, when melting white chocolate, use even lower heat (or shorter microwave bursts) and stir even more frequently. It’s often helpful to add a tiny bit of shortening to white chocolate from the start to help it melt smoothly.
- Maintain Warmth: As you work, if your chocolate starts to cool and thicken too much, you can place it back over the warm water bath (if using the double boiler method) or microwave it for a quick 10-15 second burst (if using the microwave method), stirring well until it’s back to the right consistency. Keeping the chocolate at a consistent, workable temperature is vital for beautiful, even coatings on your chocolate covered strawberry turkeys.
Dipping the Strawberries
Now that our chocolate is perfectly melted and our strawberries are bone-dry, it’s time for the delicious transformation to begin! This step is all about technique to ensure your chocolate covered strawberry turkeys have a flawless foundation.
- Choose Your Dipping Chocolate: For the main body of our turkeys, I find that the rich, dark chocolate creates a wonderful contrast with the bright red strawberry and provides a classic turkey-like base. However, if you prefer a lighter look, milk chocolate works beautifully too. I personally love the robust flavor of a dark chocolate base for these strawberry turkeys.
- Hold with Care: Grasp a thoroughly dried strawberry by its green cap or stem. Try to avoid touching the strawberry flesh itself, as the oils from your fingers can prevent the chocolate from adhering properly. If your strawberries have short stems, you can insert a toothpick into the top to use as a handle.
- The Dipping Technique: Dip the strawberry into the bowl of melted dark chocolate. Submerge it almost completely, leaving just a sliver of the green cap showing, or covering it entirely if you prefer.
- Gently twist and rotate the strawberry to ensure it’s fully coated in chocolate.
- Lift the strawberry from the chocolate and hold it over the bowl, allowing any excess chocolate to drip back into the bowl. You can gently tap your wrist against the edge of the bowl a few times to encourage excess chocolate to run off. We want a nice, even coating, not a thick, clunky one.
- The goal is a smooth, even layer of chocolate that completely encases the strawberry, forming the plump body of our chocolate covered strawberry turkeys.
- Place on Parchment: Carefully place the chocolate-dipped strawberry onto your parchment-lined baking sheet. Leave a little space between each strawberry, as we’ll be adding embellishments soon and don’t want them sticking together.
- Repeat and Chill Briefly: Continue dipping the rest of your strawberries. Once you’ve dipped about half a dozen, you might want to pop the baking sheet into the refrigerator for 5-10 minutes. This brief chill will help the chocolate set just enough so that it’s still slightly tacky but firm enough to hold the various candy features we’re about to add without them sliding off. Don’t let them chill for too long at this stage, or the chocolate will be too firm for easy assembly. We’re aiming for that sweet spot where the chocolate is still pliable for decoration.
Transforming Strawberries into Turkeys: The Assembly
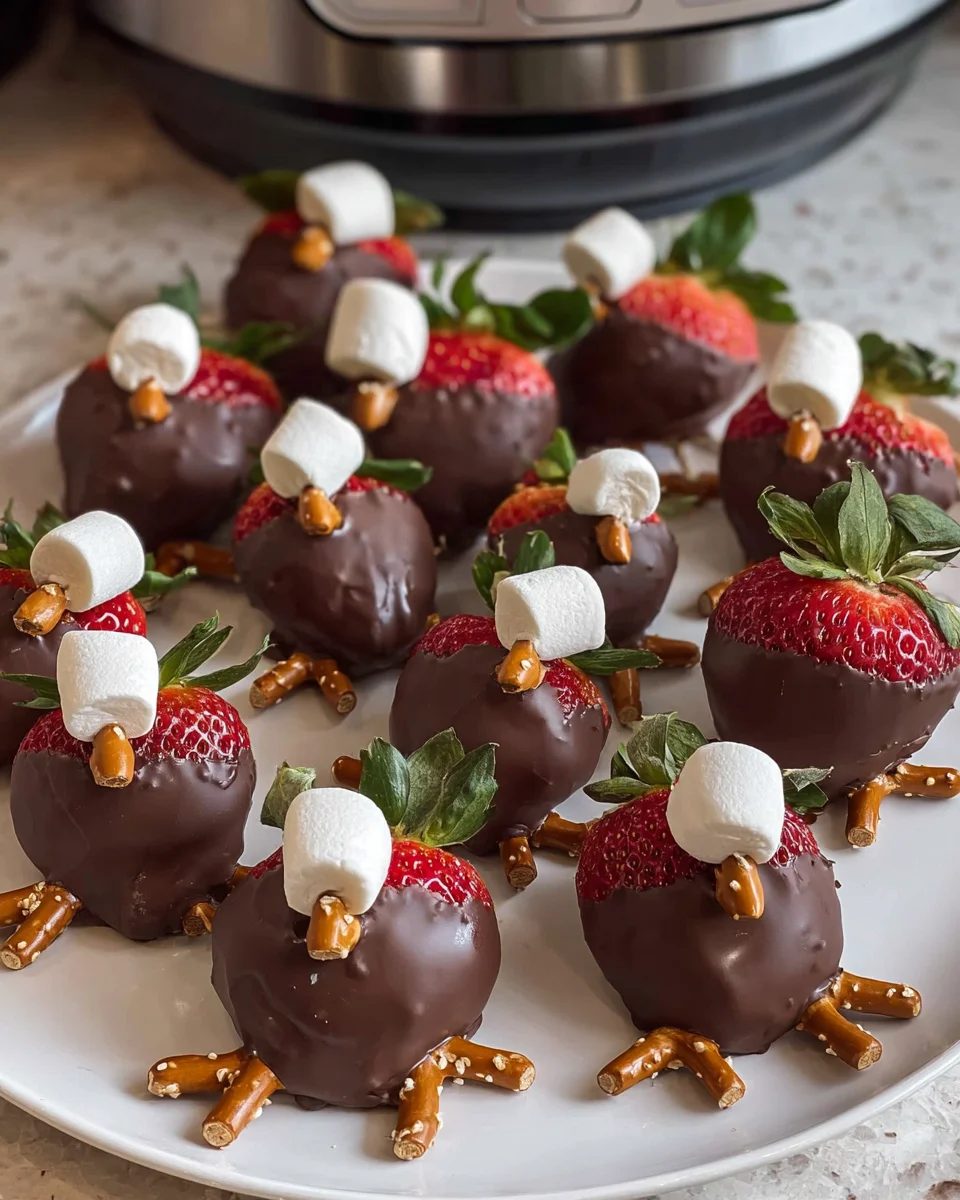
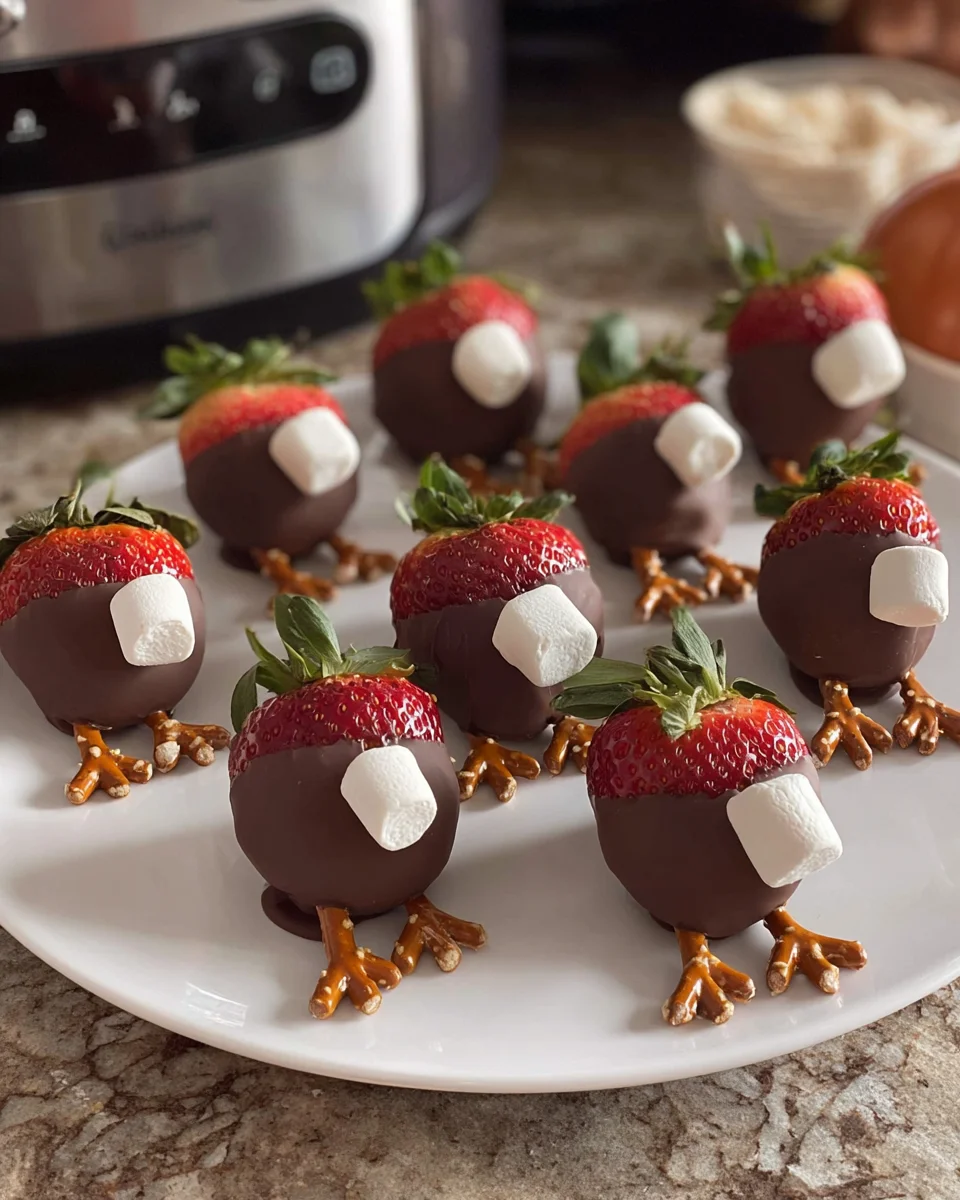
This is where the magic truly happens, and our simple chocolate covered strawberries evolve into charming chocolate covered strawberry turkeys! Work swiftly but carefully, as the setting chocolate is your “glue.”
- Working While Wet (Crucial Step!): As soon as you take your dipped strawberries out of their brief chill (or even right after dipping, if you’re working quickly), it’s time to add the turkey features. The chocolate should be tacky enough to hold the embellishments, but not so runny that they slide off. If the chocolate has set too much, you can use a tiny dot of melted white chocolate as “glue.”
- The Majestic Tail Feathers: Take your pretzel sticks or pieces. Gently insert 3-5 pretzel pieces into the back, wider end of each strawberry. You’ll want to push them in just enough so they feel secure but don’t crack the chocolate or split the strawberry. Arrange them in a fanned-out, semi-circular shape to mimic a proud turkey’s tail. I find that a mix of longer and shorter pieces gives a more dynamic, natural look to these chocolate covered strawberry turkeys.
- The Expressive Eyes: Next, carefully place two mini candy eyeballs onto the front (pointier end) of the strawberry, just below the green cap. These are usually self-adhesive if the chocolate is still wet enough. If not, use a tiny dot of your melted white chocolate on the back of each eyeball before pressing them into place. Position them slightly apart to give your turkey a friendly, wide-eyed look. This really brings the character to your chocolate covered strawberry turkeys!
- The Perky Beak: Take the yellow tip of a piece of candy corn (or the entire piece if you prefer a larger beak) and gently press it just below and between the candy eyeballs. The pointed end should face outwards. Again, if the dark chocolate has firmed up too much, a small dab of white chocolate will secure it perfectly.
- The Wobbly Wattle (Optional, but Adorable!): For an extra touch of realism and cuteness, you can add a small wattle. If you have tiny red candy bits or sprinkles, you can attach one just below the candy corn beak using a tiny dot of white chocolate. Some people even use a small sliver of the orange part of a candy corn, though red is more traditional for a wattle. This small detail truly makes your chocolate covered strawberry turkeys stand out!
- White Chocolate Accents and Details: Now, let’s use that melted white chocolate for some finesse!
- Piping Details: Pour your melted white chocolate into a small piping bag fitted with a very small round tip, or simply use a re-sealable plastic bag and snip off a tiny corner.
- “Glue” Reinforcement: If any of your features (eyes, beak, pretzels) seem loose or didn’t adhere well to the wet dark chocolate, use a tiny dot of white chocolate piped precisely where needed to secure them firmly.
- Adding Character: You can pipe small white dots on the candy eyeballs for added sparkle or even a tiny white “collar” around the base of the turkey’s head where the strawberry meets the chocolate. Get creative! A small zigzag pattern on the tail feathers can also add texture. These fine details make your chocolate covered strawberry turkeys truly unique.
- Festive Sprinkles (Optional Flourish): If you want to add some extra sparkle, gently scatter some festive autumn-themed sprinkles around the base of the strawberry, or even on the chocolate-covered body itself, while the chocolate is still slightly wet. This adds a wonderful pop of color and texture to your finished chocolate covered strawberry turkeys.
The Finishing Touches and Storage
You’ve done it! Your flock of adorable chocolate covered strawberry turkeys is almost ready to delight. A few final steps will ensure they look their best and stay fresh.
- Allow to Set Completely: Once all your chocolate covered strawberry turkeys are assembled and decorated, carefully transfer the baking sheet back to the refrigerator. Allow them to chill for at least 20-30 minutes, or until the chocolate is completely firm and set to the touch. This firm setting is crucial not only for the chocolate itself but also to ensure all the delightful candy features are securely attached. You don’t want any eyes or beaks falling off when they’re picked up! The firm chocolate will provide the structural integrity needed for these charming treats.
- Inspect and Admire: After they’ve fully set, take a moment to admire your handiwork! Each chocolate covered strawberry turkey will have its own unique personality. If any small adjustments are needed, like gently repositioning a wattle or adding another tiny dot of white chocolate “glue,” now is the time to do it.
- Presentation Matters: When serving, arrange your chocolate covered strawberry turkeys beautifully on a platter. You can place them on a bed of fall leaves (edible ones, if you’re feeling fancy, or decorative ones for presentation only), surrounded by small candies, or even nestled among mini pumpkins and gourds. Their vibrant colors and whimsical design make them a perfect centerpiece for any autumn gathering or holiday table. Imagine the smiles when guests see these festive chocolate covered strawberry turkeys!
- Storage Instructions: These delicate chocolate covered strawberry turkeys are best enjoyed fresh, ideally within 1-2 days of making them.
- Refrigeration: Store them in a single layer in an airtight container in the refrigerator. If you must stack them, separate layers with parchment paper to prevent sticking and damage to the decorations.
- Preventing Condensation: When taking them out of the refrigerator, allow the container to sit at room temperature for about 10-15 minutes before opening. This helps prevent condensation from forming on the chocolate, which can cause a dull finish or “sugar bloom.”
- Enjoyment: While they are refrigerated, the strawberries themselves will slowly soften and release moisture, so they are not ideal for long-term storage. But honestly, I doubt they’ll last that long – these chocolate covered strawberry turkeys are usually devoured quickly due to their irresistible charm and deliciousness!
- Troubleshooting Tip: If you find that some of your features (like the candy eyes or beaks) aren’t sticking well, remember that melted white chocolate is your best friend as a culinary adhesive. Just a tiny dab with a toothpick can secure almost anything. If the chocolate base of your turkey cracks slightly during handling, don’t fret! You can often camouflage small imperfections with a drizzle of white chocolate or a strategically placed sprinkle.
Congratulations! You’ve successfully created a delightful and festive batch of chocolate covered strawberry turkeys. These adorable treats are not only a joy to make but are guaranteed to bring smiles and compliments from everyone who tries them. Happy gobbling!
Conclusion:
Well, my friends, we’ve reached the sweet finale of our culinary journey together, and I truly hope you’re as excited as I am about what we’ve created. This recipe, dear reader, isn’t just another dessert; it’s a delightful experience waiting to unfold in your kitchen. Why is it an absolute must-try, you ask? Because it masterfully combines the fresh, juicy sweetness of strawberries with the rich, indulgent comfort of chocolate, all while presenting itself in the most charmingly festive package imaginable. Imagine the smiles, the gasps of delight, and the immediate reach for a treat when these appear on your table. They manage to be incredibly impressive without demanding hours of your precious time, making them the perfect candidate for busy holiday preparations or simply when you want to create something special without the stress.
I find immense joy in crafting desserts that look like they’ve leaped straight out of a professional bakery window but are, in fact, incredibly approachable for home cooks of all skill levels. That’s precisely the magic of these adorable treats. The process is meditative, fun, and yields results that are both visually stunning and utterly delicious. There’s a true sense of accomplishment when you see these little edible masterpieces lined up, each one a testament to your creativity and a promise of pure deliciousness. They truly elevate any dessert spread, acting as both a treat and a conversation starter, making them an indispensable addition to your holiday repertoire or any gathering that calls for a touch of whimsy and elegance.
Now, let’s talk about making these beauties shine even brighter! When it comes to serving, these wonderful creations are incredibly versatile. They make an exquisite standalone dessert, perhaps artfully arranged on a beautiful platter for an immediate “wow” factor. For a more elaborate spread, consider pairing them with a simple vanilla bean panna cotta or a light fruit salad; the contrast in textures and flavors would be divine. They also make magnificent, edible centerpieces for your Thanksgiving feast or any autumn celebration. Picture them nestled among decorative gourds and fall leaves – absolutely stunning! Don’t forget, they also make thoughtful and beautiful gifts; simply package a few in a small box tied with a festive ribbon, and you’ve got a homemade present that’s sure to impress and be genuinely appreciated. Imagine the delight of receiving a box of these charming treats, knowing the care and thought that went into making them. For a truly decadent experience, serve them alongside a piping hot mug of spiced apple cider or a robust espresso, allowing the rich chocolate to mingle beautifully with other comforting flavors.
But the fun doesn’t stop there! One of my favorite aspects of home baking is the freedom to experiment, and this recipe lends itself beautifully to creative variations. Feel free to play with different types of chocolate: perhaps a bold dark chocolate for a more intense flavor, a creamy milk chocolate for a classic sweetness, or even a vibrant white chocolate base for a completely different aesthetic. You could also tint your white chocolate with food coloring to create turkeys with colorful “plumage” – think subtle oranges, yellows, or even deep reds to match your festive theme. For the “feathers,” instead of just chocolate, consider using finely chopped nuts (like pecans or walnuts) for added texture and a nutty flavor, or try crushed pretzels for a salty-sweet crunch that is simply irresistible. If you’re feeling extra adventurous, you could even add a tiny pinch of cayenne pepper to your dark chocolate for a subtle, unexpected kick, or a hint of orange zest to the chocolate dip for a brighter note. The eyes can vary too – while candy eyes are super convenient, you could also use tiny dots of melted white or dark chocolate, or even mini chocolate chips, to give each turkey a unique personality. And for those who love a little sparkle, a dusting of edible glitter or some colorful sprinkles on the chocolate feathers would add an extra touch of magic. The possibilities are truly endless, limited only by your imagination and the contents of your pantry!
So, there you have it. My heartfelt encouragement for you to dive into your kitchen and give these Chocolate Covered Strawberry Turkeys a try. I promise you, the process is rewarding, and the results are undeniably delicious and visually spectacular. Don’t be shy – embrace the joy of creating something beautiful and tasty with your own hands. I am genuinely so excited for you to experience the delight that comes from making and sharing these wonderful treats. Once you’ve made them, I would absolutely love to hear about your experience! Did you stick to the recipe, or did you venture into your own creative variations? What was the reaction of your friends and family? Please, share your stories, your triumphs, and especially your photos with me. Let’s build a community of enthusiastic bakers who find joy in these delightful culinary creations. Happy making, and happy feasting!
Chocolate Covered Strawberry Turkeys – Festive Fun!
Chocolate Covered Strawberry Turkeys are a delightful, edible twist on holiday treats, perfect for Thanksgiving. This recipe transforms juicy strawberries into adorable, chocolate-covered turkey characters, offering a lighter, fruity, and visually stunning dessert that’s fun to make with family.
Ingredients
Instructions
Important Information
Nutrition Facts (Per Serving)
It is important to consider this information as approximate and not to use it as definitive health advice.
Allergy Information
Please check ingredients for potential allergens and consult a health professional if in doubt.

Leave a Comment